Inline markup allows words and phrases within text to have
character styles (like italics and boldface) and functionality
(like hyperlinks).
Plain text
Typical result
Notes
*emphasis*
emphasis
Normally rendered as italics.
**strong emphasis**
strong emphasis
Normally rendered as boldface.
`interpreted text`
(see note at right)
The rendering and meaning of interpreted text is
domain- or application-dependent. It can be used for things
like index entries or explicit descriptive markup (like program
identifiers).
``inline literal``
inline literal
Normally rendered as monospaced text. Spaces should be
preserved, but line breaks will not be.
With two underscores instead of one, both simple and phrase
references may be anonymous (the reference text is not repeated
at the target). See Hyperlink Targets.
Asterisk, backquote, vertical bar, and underscore are inline
delimiter characters. Asterisk, backquote, and vertical bar act
like quote marks; matching characters surround the marked-up word
or phrase, whitespace or other quoting is required outside them,
and there can't be whitespace just inside them. If you want to use
inline delimiter characters literally, escape
(with backslash) or quote them (with double backquotes; i.e.
use inline literals).
In detail, the reStructuredText specification says that in
inline markup, the following rules apply to start-strings and
end-strings (inline markup delimiters):
The start-string must start a text block or be
immediately preceded by whitespace or any of
' " ( [ { or <.
The start-string must be immediately followed by non-whitespace.
The end-string must be immediately preceded by non-whitespace.
The end-string must end a text block (end of document or
followed by a blank line) or be immediately followed by whitespace
or any of ' " . , : ; ! ? - ) ] } / \
or >.
If a start-string is immediately preceded by one of
' " ( [ { or <, it must not be
immediately followed by the corresponding character from
' " ) ] } or >.
An end-string must be separated by at least one
character from the start-string.
An unescaped backslash preceding a
start-string or end-string will disable markup recognition, except
for the end-string of inline literals.
Also remember that inline markup may not be nested (well,
except that inline literals can contain any of the other inline
markup delimiter characters, but that doesn't count because
nothing is processed).
reStructuredText uses backslashes ("\") to override the special
meaning given to markup characters and get the literal characters
themselves. To get a literal backslash, use an escaped backslash
("\\"). For example:
Raw reStructuredText
Typical result
*escape* ``with`` "\"
escapewith ""
\*escape* \``with`` "\\"
*escape* ``with`` "\"
In Python strings it will, of course, be necessary
to escape any backslash characters so that they actually
reach reStructuredText.
The simplest way to do this is to use raw strings:
===== Title ===== Subtitle -------- Titles are underlined (or over- and underlined) with a printing nonalphanumeric 7-bit ASCII character. Recommended choices are "``= - ` : ' " ~ ^ _ * + # < >``". The underline/overline must be at least as long as the title text. A lone top-level (sub)section is lifted up to be the document's (sub)title.
Title
Subtitle
Titles are underlined (or over-
and underlined) with a printing
nonalphanumeric 7-bit ASCII
character. Recommended choices
are "= - ` : ' " ~ ^ _ * + # < >".
The underline/overline must be at
least as long as the title text.
A lone top-level (sub)section is
lifted up to be the document's
(sub)title.
3. This is the first item 4. This is the second item 5. Enumerators are arabic numbers, single letters, or roman numerals 6. List items should be sequentially numbered, but need not start at 1 (although not all formatters will honour the first index). #. This item is auto-enumerated
Enumerated lists:
This is the first item
This is the second item
Enumerators are arabic numbers, single letters,
or roman numerals
List items should be sequentially numbered,
but need not start at 1 (although not all
formatters will honour the first index).
what Definition lists associate a term with a definition.
how The term is a one-line phrase, and the definition is one or more paragraphs or body elements, indented relative to the term. Blank lines are not allowed between term and definition.
Definition lists:
what
Definition lists associate a term with
a definition.
how
The term is a one-line phrase, and the
definition is one or more paragraphs or
body elements, indented relative to the
term. Blank lines are not allowed
between term and definition.
:Version: 1.0 of 2001/08/08 :Dedication: To my father.
Authors:
Tony J. (Tibs) Ibbs,
David Goodger
(and sundry other good-natured folks)
Version:
1.0 of 2001/08/08
Dedication:
To my father.
Field lists are used as part of an extension syntax, such as
options for directives, or database-like
records meant for further processing. Field lists may also be
used as generic two-column table constructs in documents.
-a command-line option "a"
-b file options can have arguments
and long descriptions
--long options can be long also
--input=file long options can also have
arguments
/V DOS/VMS-style options too
-a
command-line option "a"
-b file
options can have arguments and long descriptions
--long
options can be long also
--input=file
long options can also have arguments
/V
DOS/VMS-style options too
There must be at least two spaces between the option and the
description.
A paragraph containing only two colons indicates that the following indented or quoted text is a literal block.
::
Whitespace, newlines, blank lines, and
all kinds of markup (like *this* or
\this) is preserved by literal blocks.

The paragraph containing only '::'
will be omitted from the result.
The ``::`` may be tacked onto the very end of any paragraph. The ``::`` will be omitted if it is preceded by whitespace. The ``::`` will be converted to a single colon if preceded by text, like this::
It's very convenient to use this form.
Literal blocks end when text returns to the preceding paragraph's indentation. This means that something like this is possible::
    We start here
    and continue here
and end here.
Per-line quoting can also be used on unindented literal blocks::
> Useful for quotes from email and
> for Haskell literate programming.
A paragraph containing only two colons
indicates that the following indented or quoted
text is a literal block.
Whitespace, newlines, blank lines, and
all kinds of markup (like *this* or
\this) is preserved by literal blocks.
The paragraph containing only '::'
will be omitted from the result.
The :: may be tacked onto the very
end of any paragraph. The :: will be
omitted if it is preceded by whitespace.
The :: will be converted to a single
colon if preceded by text, like this:
It's very convenient to use this form.
Literal blocks end when text returns to
the preceding paragraph's indentation.
This means that something like this is possible:
We start here
and continue here
and end here.
Per-line quoting can also be used on
unindented literal blocks:
> Useful for quotes from email and
> for Haskell literate programming.
| Line blocks are useful for addresses, | verse, and adornment-free lists. | | Each new line begins with a | vertical bar ("|"). | Line breaks and initial indents | are preserved. | Continuation lines are wrapped portions of long lines; they begin with spaces in place of vertical bars.
Line blocks are useful for addresses,
verse, and adornment-free lists.
Each new line begins with a
vertical bar ("|").
Line breaks and initial indents
are preserved.
Continuation lines are wrapped portions
of long lines; they begin
with spaces in place of vertical bars.
Doctest blocks are interactive
Python sessions. They begin with
"``>>>``" and end with a blank line.
>>> print "This is a doctest block."
This is a doctest block.
Doctest blocks are interactive
Python sessions. They begin with
">>>" and end with a blank line.
>>> print "This is a doctest block."
This is a doctest block.
"The doctest
module searches a module's docstrings for text that looks like an
interactive Python session, then executes all such sessions to
verify they still work exactly as shown." (From the doctest docs.)
There are two syntaxes for tables in reStructuredText. Grid
tables are complete but cumbersome to create. Simple tables are
easy to create but limited (no row spans, etc.).
A transition marker is a horizontal line
of 4 or more repeated punctuation
characters.
------------
A transition should not begin or end a
section or document, nor should two
transitions be immediately adjacent.
A transition marker is a horizontal line
of 4 or more repeated punctuation
characters.
A transition should not begin or end a
section or document, nor should two
transitions be immediately adjacent.
Transitions are commonly seen in novels and short fiction, as a
gap spanning one or more lines, marking text divisions or
signaling changes in subject, time, point of view, or emphasis.
Explicit markup blocks are used for constructs which float
(footnotes), have no direct paper-document representation
(hyperlink targets, comments), or require specialized processing
(directives). They all begin with two periods and whitespace, the
"explicit markup start".
The numbering of auto-numbered footnotes is determined by the
order of the footnotes, not of the references. For auto-numbered
footnote references without autonumber labels
("[#]_"), the references and footnotes must be in the
same relative order. Similarly for auto-symbol footnotes
("[*]_").
"Fold-in" is the representation typically used in HTML
documents (think of the indirect hyperlink being "folded in" like
ingredients into a cake), and "call-out" is more suitable for
printed documents, where the link needs to be presented explicitly, for
example as a footnote. You can force usage of the call-out form by
using the
"target-notes"
directive.
reStructuredText also provides for embedded URIs (details),
a convenience at the expense of readability. A hyperlink
reference may directly embed a target URI inline, within angle
brackets. The following is exactly equivalent to the example above:
Plain text
Typical result
External hyperlinks, like `Python
<http://www.python.org/>`_.
The second hyperlink target (the line beginning with
"__") is both an indirect hyperlink target
(indirectly pointing at the Python website via the
"Python_" reference) and an anonymous hyperlink
target. In the text, a double-underscore suffix is used to
indicate an anonymous hyperlink reference. In an anonymous
hyperlink target, the reference text is not repeated. This is
useful for references with long text or throw-away references, but
the target should be kept close to the reference to prevent them
going out of sync.
Section titles, footnotes, and citations automatically generate
hyperlink targets (the title text or footnote/citation label is
used as the hyperlink name).
Plain text
Typical result
Titles are targets, too ======================= Implicit references, like `Titles are targets, too`_.
Directives are a general-purpose extension mechanism, a way of
adding support for new constructs without adding new syntax. For
a description of all standard directives, see reStructuredText
Directives.
Vivamus sagittis lacus vel augue laoreet rutrum faucibus dolor auctor.
Example body text
Nullam quis risus eget urna mollis ornare vel eu leo. Cum sociis natoque penatibus et magnis dis parturient montes, nascetur ridiculus mus. Nullam id dolor id nibh ultricies vehicula.
This line of text is meant to be treated as fine print.
The following snippet of text is rendered as bold text.
The following snippet of text is rendered as italicized text.
An abbreviation of the word attribute is attr.
Emphasis classes
Fusce dapibus, tellus ac cursus commodo, tortor mauris nibh.
Nullam id dolor id nibh ultricies vehicula ut id elit.
Etiam porta sem malesuada magna mollis euismod.
Donec ullamcorper nulla non metus auctor fringilla.
Duis mollis, est non commodo luctus, nisi erat porttitor ligula.
Maecenas sed diam eget risus varius blandit sit amet non magna.
Blockquotes
Lorem ipsum dolor sit amet, consectetur adipiscing elit. Integer posuere erat a ante.
Someone famous in Source Title
Lorem ipsum dolor sit amet, consectetur adipiscing elit. Integer posuere erat a ante.
Raw denim you probably haven't heard of them jean shorts Austin. Nesciunt tofu stumptown aliqua, retro synth master cleanse. Mustache cliche tempor, williamsburg carles vegan helvetica. Reprehenderit butcher retro keffiyeh dreamcatcher synth. Cosby sweater eu banh mi, qui irure terry richardson ex squid. Aliquip placeat salvia cillum iphone. Seitan aliquip quis cardigan american apparel, butcher voluptate nisi qui.
Food truck fixie locavore, accusamus mcsweeney's marfa nulla single-origin coffee squid. Exercitation +1 labore velit, blog sartorial PBR leggings next level wes anderson artisan four loko farm-to-table craft beer twee. Qui photo booth letterpress, commodo enim craft beer mlkshk aliquip jean shorts ullamco ad vinyl cillum PBR. Homo nostrud organic, assumenda labore aesthetic magna delectus mollit.
Etsy mixtape wayfarers, ethical wes anderson tofu before they sold out mcsweeney's organic lomo retro fanny pack lo-fi farm-to-table readymade. Messenger bag gentrify pitchfork tattooed craft beer, iphone skateboard locavore carles etsy salvia banksy hoodie helvetica. DIY synth PBR banksy irony. Leggings gentrify squid 8-bit cred pitchfork.
Trust fund seitan letterpress, keytar raw denim keffiyeh etsy art party before they sold out master cleanse gluten-free squid scenester freegan cosby sweater. Fanny pack portland seitan DIY, art party locavore wolf cliche high life echo park Austin. Cred vinyl keffiyeh DIY salvia PBR, banh mi before they sold out farm-to-table VHS viral locavore cosby sweater.
Best check yo self, you're not looking too good. Nulla vitae elit libero, a pharetra augue. Praesent commodo cursus magna, vel scelerisque nisl consectetur et.
When you run nikola --help you will see something like this:
$ nikola helpNikola is a tool to create static websites and blogs. For full documentation and moreinformation, please visit https://getnikola.com/Available commands:nikola auto automatically detect site changes, rebuild and optionally refresh a browsernikola bootswatch_theme given a swatch name from bootswatch.com and a parent theme, creates a custom themenikola build run tasksnikola check check links and files in the generated sitenikola clean clean action / remove targetsnikola console start an interactive python console with access to your site and configurationnikola deploy deploy the sitenikola dumpdb dump dependency DBnikola forget clear successful run status from internal DBnikola help show helpnikola ignore ignore task (skip) on subsequent runsnikola import_blogger import a blogger dumpnikola import_feed import a RSS/Atom dumpnikola import_wordpress import a WordPress dumpnikola init create a Nikola site in the specified foldernikola list list tasks from dodo filenikola mincss apply mincss to the generated sitenikola new_post create a new blog post or site pagenikola run run tasksnikola serve start the test webservernikola strace use strace to list file_deps and targetsnikola theme manage themesnikola version print the Nikola version numbernikola help show help / referencenikola help <command> show command usagenikola help <task-name> show task usage
That will give you a list of all available commands in your version of Nikola.
Each and every one of those is a plugin. Let's look at a typical example:
First, the serve.plugin file:
[Core]Name=serveModule=serve[Documentation]Author=Roberto AlsinaVersion=0.1Website=https://getnikola.comDescription=Start test server.
Note
If you want to publish your plugin on the Plugin Index, read
the docs for the Index
(and the .plugin file examples and explanations).
For your own plugin, just change the values in a sensible way. The
Module will be used to find the matching Python module, in this case
serve.py, from which this is the interesting bit:
fromnikola.plugin_categoriesimportCommand# You have to inherit Command for this to be a# command plugin:classCommandServe(Command):"""Start test server."""name="serve"doc_usage="[options]"doc_purpose="start the test webserver"cmd_options=({'name':'port','short':'p','long':'port','default':8000,'type':int,'help':'Port number (default: 8000)',},{'name':'address','short':'a','long':'--address','type':str,'default':'127.0.0.1','help':'Address to bind (default: 127.0.0.1)',},)def_execute(self,options,args):"""Start test server."""out_dir=self.site.config['OUTPUT_FOLDER']ifnotos.path.isdir(out_dir):print("Error: Missing '{0}' folder?".format(out_dir))else:os.chdir(out_dir)httpd=HTTPServer((options['address'],options['port']),OurHTTPRequestHandler)sa=httpd.socket.getsockname()print("Serving HTTP on",sa[0],"port",sa[1],"...")httpd.serve_forever()
As mentioned above, a plugin can have options, which the user can see by doing
nikola help command and can later use, for example:
$ nikola help serve
Purpose: start the test webserverUsage: nikola serve [options]Options:-p ARG, --port=ARG Port number (default: 8000)-a ARG, ----address=ARG Address to bind (default: 127.0.0.1)$ nikola serve -p 9000Serving HTTP on 127.0.0.1 port 9000 ...
So, what can you do with commands? Well, anything you want, really. I have implemented
a sort of planet using it. So, be creative, and if you do something interesting,
let me know ;-)
Nikola supports Mako and Jinja2. If you prefer some other templating
system, then you will have to write a TemplateSystem plugin. Here's how they work.
First, you have to create a .plugin file. Here's the one for the Mako plugin:
[Core]Name=makoModule=mako[Documentation]Author=Roberto AlsinaVersion=0.1Website=https://getnikola.comDescription=Support for Mako templates.
Note
If you want to publish your plugin on the Plugin Index, read
the docs for the Index
(and the .plugin file examples and explanations).
You will have to replace "mako" with your template system's name, and other data
in the obvious ways.
The "Module" option is the name of the module, which has to look something like this,
a stub for a hypothetical system called "Templater":
fromnikola.plugin_categoriesimportTemplateSystem# You have to inherit TemplateSystemclassTemplaterTemplates(TemplateSystem):"""Wrapper for Templater templates."""# name has to match Name in the .plugin filename="templater"# A list of directories where the templates will be# located. Most template systems have some sort of# template loading tool that can use this.defset_directories(self,directories,cache_folder):"""Sets the list of folders where templates are located and cache."""pass# You *must* implement this, even if to return []# It should return a list of all the files that,# when changed, may affect the template's output.# usually this involves template inheritance and# inclusion.deftemplate_deps(self,template_name):"""Returns filenames which are dependencies for a template."""return[]defrender_template(self,template_name,output_name,context):"""Renders template to a file using context. This must save the data to output_name *and* return it so that the caller may do additional processing. """pass# The method that does the actual rendering.# template_name is the name of the template file,# context is a dictionary containing the data the template# uses for rendering.defrender_template_to_string(self,template,context):"""Renders template to a string using context. """passdefinject_directory(self,directory):"""Injects the directory with the lowest priority in the template search mechanism."""pass
If you want to do something that depends on the data in your site, you
probably want to do a Task plugin, which will make it be part of the
nikola build command. These are the currently available tasks, all
provided by plugins:
Other Tasks
There are also LateTask plugins, which are executed later,
and TaskMultiplier plugins that take a task and create
more tasks out of it.
$ nikola list
Scanning posts....done!build_bundlesbuild_lesscopy_assetscopy_filespost_renderredirectrender_archiverender_galleriesrender_galleries_cleanrender_indexesrender_listingsrender_pagesrender_postsrender_rssrender_siterender_sourcesrender_tagssitemap
These have access to the site object which contains your timeline and
your configuration.
The critical bit of Task plugins is their gen_tasks method, which yieldsdoit tasks.
The details of how to handle dependencies, etc., are a bit too much for this
document, so I'll just leave you with an example, the copy_assets task.
First the task_copy_assets.plugin file, which you should copy and edit
in the logical ways:
[Core]Name=copy_assetsModule=task_copy_assets[Documentation]Author=Roberto AlsinaVersion=0.1Website=https://getnikola.comDescription=Copy theme assets into output.
Note
If you want to publish your plugin on the Plugin Index, read
the docs for the Index
(and the .plugin file examples and explanations).
And the task_copy_assets.py file, in its entirety:
importosfromnikola.plugin_categoriesimportTaskfromnikolaimportutils# Have to inherit Task to be a task pluginclassCopyAssets(Task):"""Copy theme assets into output."""name="copy_assets"# This yields the tasksdefgen_tasks(self):"""Create tasks to copy the assets of the whole theme chain. If a file is present on two themes, use the version from the "youngest" theme. """# I put all the configurations and data the plugin uses# in a dictionary because utils.config_changed will# make it so that if these change, this task will be# marked out of date, and run again.kw={"themes":self.site.THEMES,"output_folder":self.site.config['OUTPUT_FOLDER'],"filters":self.site.config['FILTERS'],}tasks={}fortheme_nameinkw['themes']:src=os.path.join(utils.get_theme_path(theme_name),'assets')dst=os.path.join(kw['output_folder'],'assets')fortaskinutils.copy_tree(src,dst):iftask['name']intasks:continuetasks[task['name']]=tasktask['uptodate']=task.get('uptodate',[])+ \
[utils.config_changed(kw)]task['basename']=self.name# If your task generates files, please do this.yieldutils.apply_filters(task,kw['filters'])
These plugins implement markup languages, they take sources for posts or pages and
create HTML or other output files. A good example is the misaka plugin or the built-in
compiler plugins.
They must provide:
compile
Function that builds a file.
create_post
Function that creates an empty file with some metadata in it.
If the compiler produces something other than HTML files, it should also implement extension which
returns the preferred extension for the output file.
These plugins can also be used to extract metadata from a file. To do so, the
plugin must set supports_metadata to True and implement read_metadata that will return a dict containing the
metadata contained in the file. Optionally, it may list metadata_conditions (see MetadataExtractor Plugins below)
Plugins that extract metadata from posts. If they are based on post content,
they must implement _extract_metadata_from_text (takes source of a post
returns a dict of metadata). They may also implement
split_metadata_from_text, extract_text. If they are based on filenames,
they only need extract_filename. If support_write is set to True,
write_metadata must be implemented.
Every extractor must be configured properly. The name, source (from the
MetaSource enum in metadata_extractors) and priority
(MetaPriority) fields are mandatory. There might also be a list of
conditions (tuples of MetaCondition, arg), used to check if an
extractor can provide metadata, a compiled regular expression used to split
metadata (split_metadata_re, may be None, used by default
split_metadata_from_text), a list of requirements (3-tuples: import
name, pip name, friendly name), map_from (name of METADATA_MAPPING to
use, if any) and supports_write (whether the extractor supports writing
metadata in the desired format).
For more details, see the definition in plugin_categories.py and default extractors in metadata_extractors.py.
Implement directives for reStructuredText, see media.py for a simple example.
If your output depends on a config value, you need to make your post record a
dependency on a pseudo-path, like this:
####MAGIC####CONFIG:OPTIONNAME
Then, whenever the OPTIONNAME option is changed in conf.py, the file will be rebuilt.
If your directive depends or may depend on the whole timeline (like the
post-list directive, where adding new posts to the site could make it
stale), you should record a dependency on the pseudo-path
####MAGIC####TIMELINE.
These plugins extend the SignalHandler class and connect to one or more
signals via blinker.
The easiest way to do this is to reimplement set_site() and just connect to
whatever signals you want there.
Currently Nikola emits the following signals:
sighandlers_loaded
Right after SignalHandler plugin activation.
initialized
When all tasks are loaded.
configured
When all the configuration file is processed. Note that plugins are activated before this is emitted.
scanned
After posts are scanned.
new_post / new_page
When a new post is created, using the nikola new_post/nikola new_page commands. The signal
data contains the path of the file, and the metadata file (if there is one).
existing_post / existing_page
When a new post fails to be created due to a title conflict. Contains the same data as new_post.
deployed
When the nikola deploy command is run, and there is at least one new
entry/post since last_deploy. The signal data is of the form:
{
 'last_deploy: # datetime object for the last deployed time,
 'new_deploy': # datetime object for the current deployed time,
 'clean': # whether there was a record of a last deployment,
 'deployed': # all files deployed after the last deploy,
 'undeployed': # all files not deployed since they are either future posts/drafts
}
compiled
When a post/page is compiled from its source to html, before anything else is done with it. The signal
data is in the form:
{
 'source': # the path to the source file
 'dest': # the path to the cache file for the post/page
 'post': # the Post object for the post/page
}
Any plugin can register a function using Nikola.register_path_handler to
allow resolution of paths and links. These are useful for templates, which
can access them via _link.
For example, you can always get a link to the path for the feed of the "foo" tag
by using _link('tag_rss', 'foo') or the link://tag_rss/foo URL.
Here's the relevant code from the tag plugin.
# In set_sitesite.register_path_handler('tag_rss',self.tag_rss_path)# And these always take name and lang as arguments and return a list of# path elements.deftag_rss_path(self,name,lang):return[_ffor_fin[self.site.config['TRANSLATIONS'][lang],self.site.config['TAG_PATH'],self.slugify_name(name,lang)+".xml"]if_f]
Plugins can use a hook system for adding stuff into templates. In order to use
it, a plugin must register itself. The following hooks currently exist:
extra_head (not equal to the config option!)
body_end (not equal to the config option!)
page_header
menu
menu_alt (right-side menu in bootstrap, after menu in base)
page_footer
For example, in order to register a script into extra_head:
# In set_sitesite.template_hooks['extra_head'].append('<script src="/assets/js/fancyplugin.js">')
There is also another API available. It allows use of dynamically generated
HTML:
# In set_sitedefgenerate_html_bit(name,ftype='js'):"""Generate HTML for an asset."""return'<script src="/assets/{t}/{n}.{t}">'.format(n=name,t=ftype)site.template_hooks['extra_head'].append(generate_html_bit,False,'fancyplugin',ftype='js')
The second argument to append() is used to determine whether the function
needs access to the current template context and the site. If it is set to
True, the function will also receive site and context keyword
arguments. Example use:
# In set_sitedefgreeting(addr,endswith='',site=None,context=None):"""Greet someone."""ifcontext['lang']=='en':greet=u'Hello'elifcontext['lang']=='es':greet=u'¡Hola't=u' BLOG_TITLE = {0}'.format(site.config['BLOG_TITLE'](context['lang']))returnu'<h3>{greet}{addr}{endswith}</h3>'.format(greet=greet,addr=addr,endswith=endswith)+tsite.template_hooks['page_header'].append(greeting,True,u'Nikola Tesla',endswith=u'!')
Dependencies for template hooks:
if the input is a string, the string value, alongside arguments to append, is used for calculating dependencies
if the input is a callable, it attempts input.template_registry_identifier, then input.__doc__, and if neither is available, it uses a static string.
Make sure to provide at least a docstring, or a identifier, to ensure rebuilds work properly.
Some (hopefully all) markup compilers support shortcodes in these forms:
{{% foo %}}  # No arguments
    {{% foo bar %}}  # One argument, containing "bar"
    {{% foo bar baz=bat %}}  # Two arguments, one containing "bar", one called "baz" containing "bat"

    {{% foo %}}Some text{{% /foo %}}  # one argument called "data" containing "Some text"
So, if you are creating a plugin that generates markup, it may be a good idea
to register it as a shortcode in addition of to restructured text directive or
markdown extension, thus making it available to all markup formats.
To implement your own shortcodes from a plugin, you can create a plugin inheriting ShortcodePlugin and
from its set_site method, call
Nikola.register_shortcode(name, func) with the following arguments:
name:
Name of the shortcode ("foo" in the examples above)
func:
A function that will handle the shortcode
The shortcode handler must return a two-element tuple, (output, dependencies)
output:
The text that will replace the shortcode in the document.
dependencies:
A list of all the files on disk which will make the output be considered
out of date. For example, if the shortcode uses a template, it should be
the path to the template file.
The shortcode handler must accept the following named arguments (or
variable keyword arguments):
site:
An instance of the Nikola class, to access site state
data:
If the shortcut is used as opening/closing tags, it will be the text
between them, otherwise None.
lang:
The current language.
If the shortcode tag has arguments of the form foo=bar they will be
passed as named arguments. Everything else will be passed as positional
arguments in the function call.
So, for example:
{{% foo bar baz=bat beep %}}Some text{{% /foo %}}
Assuming you registered foo_handler as the handler function for the
shortcode named foo, this will result in the following call when the above
shortcode is encountered:
Another way to define a new shortcode is to add a template file to the
shortcodes directory of your site. The template file must have the
shortcode name as the basename and the extension .tmpl. For example, if you
want to add a new shortcode named foo, create the template file as
shortcodes/foo.tmpl.
When the shortcode is encountered, the matching template will be rendered with
its context provided by the arguments given in the shortcode. Keyword arguments
are passed directly, i.e. the key becomes the variable name in the template
namespace with a matching string value. Non-keyword arguments are passed as
string values in a tuple named _args. As for normal shortcodes with a
handler function, site and data will be added to the keyword arguments.
Example:
The following shortcode:
{{% foo bar="baz" spam %}}
With a template in shortcodes/foo.tmpl with this content (using Jinja2
syntax in this example)
Sometimes your plugins will need to cache things to speed up further actions. Here are the conventions for that:
If it's a file, put it somewhere in self.site.config['CACHE_FOLDER'] (defaults to cache/.
If it's a value, use self.site.cache.set(key, value) to set it and self.site.cache.get(key) to get it.
The key should be a string, the value should be json-encodable (so, be careful with datetime objects)
The values and files you store there can and will be deleted sometimes by the user. They should always be
things you can reconstruct without lossage. They are throwaways.
On the other hand, sometimes you want to save something that is not a throwaway. These are things that may
change the output, so the user should not delete them. We call that state. To save state:
If it's a file, put it somewhere in the working directory. Try not to do that please.
If it's a value, use self.site.state.set(key, value) to set it and self.state.cache.get(key) to get it.
The key should be a string, the value should be json-encodable (so, be careful with datetime objects)
The cache and state objects are rather simplistic, and that's intentional. They have no default values: if
the key is not there, you will get None and like it. They are meant to be both threadsafe, but hey, who can
guarantee that sort of thing?
There are no sections, and no access protection, so let's not use it to store passwords and such. Use responsibly.
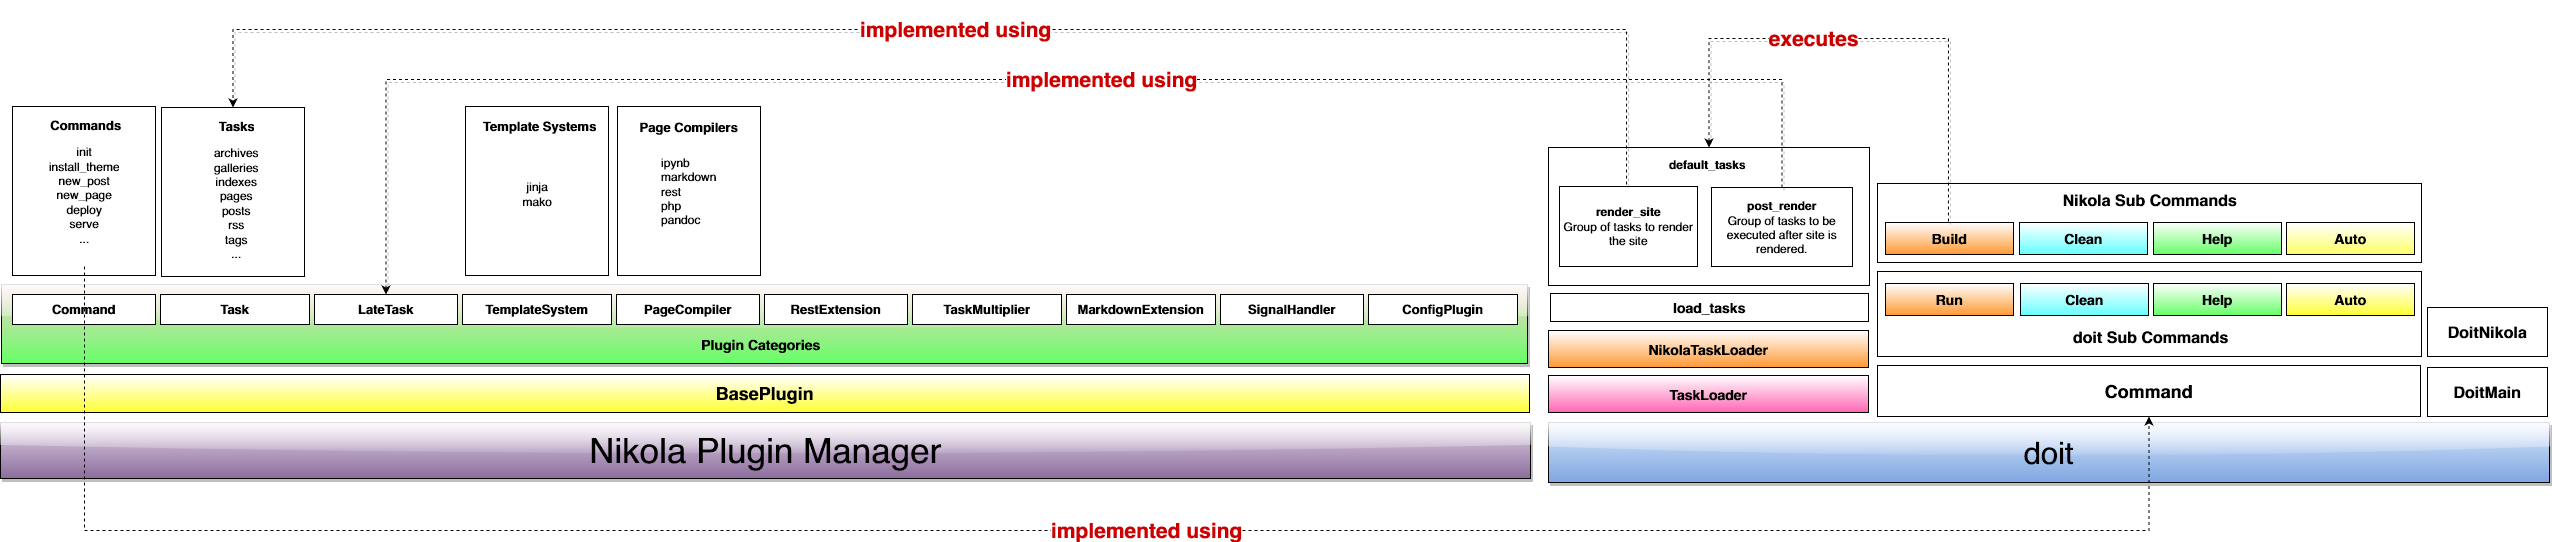
When trying to guide someone into adding a feature in Nikola, it hit me that
while the way it's structured makes sense to me it is far from obvious.
So, this is a short document explaining what each piece of Nikola does and
how it all fits together.
Nikola is a Pile of Plugins
Most of Nikola is implemented as plugins using Yapsy.
You can ignore that they are plugins and just think of them as regular python
modules and packages with a funny little .plugin file next to them.
So, 90% of the time, what you want to do is either write a new plugin or extend
an existing one.
There are several kinds of plugins, all implementing interfaces defined in
nikola/plugin_categories.py and documented in
Extending Nikola
If your plugin has a dependency, please make sure it doesn't make Nikola
throw an exception when the dependency is missing. Try to fail gracefully
with an informative message.
Commands are plugins
When you use nikola foo you are using the plugin command/foo. Those are
used to extend Nikola's command line. Their interface is defined in the Command
class. They take options and arguments and do whatever you want, so go wild.
The build command is special
The build command triggers a whole lot of things, and is the core of Nikola
because it's the one that you use to build sites. So it deserves its own section.
The Build Command
Nikola's goal is similar, deep at heart, to a Makefile. Take sources, compile them
into something, in this case a website. Instead of a Makefile, Nikola uses
doit
Doit has the concept of "tasks". The 1 minute summary of tasks is that they have:
actions
What the task does. For example, convert a markdown document into HTML.
dependencies
If this file changes, then we need to redo the actions. If this configuration
option changes, redo it, etc.
targets
Files that the action generates. No two actions can have the same targets.
basename:name
Each task is identified by either a name or a basename:name pair.
More about tasks
If you ever want to do your own tasks, you really should read the doit
documentation on tasks
So, what Nikola does, when you use the build command, is to read the
configuration conf.py from the current folder, instantiate
the Nikola class, and have it generate a whole list of tasks for doit
to process. Then doit will decide which tasks need doing, and do them, in
the right order.
The place where the tasks are generated is in Nikola.gen_tasks, which collects tasks
from all the plugins inheriting BaseTask, massages them a bit, then passes them
to doit.
So, if you want things to happen on build you want to create a Task plugin, or extend
one of the existing ones.
Tests
While Nikola is not a hardcore TDD project, we like tests. So, please add them if you can.
You can write unit tests or integration tests. (Doctests are not supported
anymore due to fragility.)
Posts and Pages
Nikola has a concept of posts and pages. Both are more or less the same thing, except
posts are added into RSS feeds and pages are not. All of them are in a list called
"the timeline" formed by objects of class Post.
When you are creating a task that needs the list of posts and/or pages (for example,
the RSS creation plugin) on task execution time, your plugin should call self.site.scan_posts()
in gen_tasks to ensure the timeline is created and available in
self.site.timeline. You should not modify the timeline, because it will cause consistency issues.
scan_posts
The Nikola.scan_posts function can be used in plugins to force the
timeline creation, for example, while creating the tasks.
Your plugin can use the timeline to generate "stuff" (technical term). For example,
Nikola comes with plugins that use the timeline to create a website (surprised?).
The workflow included with nikola is as follows (incomplete!):
The post is assigned a compiler based on its extension and the COMPILERS option.
The compiler is applied to the post data and a "HTML fragment" is produced. That
fragment is stored in a cache (the posts plugin).
The configured theme has templates (and a template engine), which are applied to the post's
HTML fragment and metadata (the pages plugin).
The original sources for the post are copied to some accessible place (the sources plugin).
If the post is tagged, some pages and RSS feeds for each tag are updated (the tags plugin).
If the post is new, it's included in the blog's RSS feed (the rss plugin).
The post is added in the right place in the index pages for the blog (the indexes plugin).
CSS/JS/Images for the theme are put in the right places (the copy_assets and bundles plugins).
A File describing the whole site is created (the sitemap plugin).
You can add whatever you want to that list: just create a plugin for it.
You can also expand Nikola's capabilities at several points:
compilers
Nikola supports a variety of markups. If you want to add another one, you need to create
a Compiler plugin.
templates
Nikola's themes can use Jinja2 or Mako templates. If you prefer another template system,
you have to create a TemplateSystem plugin.
themes
To change how the generated site looks, you can create custom themes.
And of course, you can also replace or extend each of the existing plugins.
Nikola is a static website and blog generator. The very short explanation is
that it takes some texts you wrote, and uses them to create a folder full
of HTML files. If you upload that folder to a server, you will have a
rather full-featured website, done with little effort.
Its original goal is to create blogs, but it supports most kind of sites, and
can be used as a CMS, as long as what you present to the user is your own content
instead of something the user generates.
Since Nikola-based sites don't run any code on the server, there is no way to process
user input in forms.
Nikola can't do:
Twitter
Facebook
An Issue tracker
Anything with forms, really (except for comments!)
Keep in mind that "static" doesn't mean boring. You can have animations
or whatever fancy CSS3/HTML5 thingie you like. It only means all that HTML is
generated already before being uploaded. On the other hand, Nikola sites will
tend to be content-heavy. What Nikola is good at is at putting what you write
out there.
Most "modern" websites are dynamic in the sense that the contents of the site
live in a database, and are converted into presentation-ready HTML only when a
user wants to see the page. That's great. However, it presents some minor issues
that static site generators try to solve.
In a static site, the whole site, every page, everything, is created before
the first user even sees it and uploaded to the server as a simple folder full
of HTML files (and images, CSS, etc).
So, let's see some reasons for using static sites:
Security
Dynamic sites are prone to experience security issues. The solution for that
is constant vigilance, keeping the software behind the site updated, and
plain old good luck. The stack of software used to provide a static site,
like those Nikola generates, is much smaller (Just a web server).
A smaller software stack implies less security risk.
Obsolescence
If you create a site using (for example) WordPress, what happens when WordPress
releases a new version? You have to update your WordPress. That is not optional,
because of security and support issues. If I release a new version of Nikola, and
you don't update, nothing happens. You can continue to use the version you
have now forever, no problems.
Also, in the longer term, the very foundations of dynamic sites shift. Can you
still deploy a blog software based on Django 0.96? What happens when your
host stops supporting the PHP version you rely on? And so on.
You may say those are long term issues, or that they won't matter for years. Well,
I believe things should work forever, or as close to it as we can make them.
Nikola's static output and its input files will work as long as you can install
Python 3.4 or newer under Linux, Windows, or OS X and can find a server
that sends files over HTTP. That's probably 10 or 15 years at least.
Also, static sites are easily handled by the Internet Archive.
Cost and Performance
On dynamic sites, every time a reader wants a page, a whole lot of database
queries are made. Then a whole pile of code chews that data, and HTML is
produced, which is sent to the user. All that requires CPU and memory.
On a static site, the highly optimized HTTP server reads the file from disk
(or, if it's a popular file, from disk cache), and sends it to the user. You could
probably serve a bazillion (technical term) page views from a phone using
static sites.
Lock-in
On server-side blog platforms, sometimes you can't export your own data, or
it's in strange formats you can't use in other services. I have switched
blogging platforms from Advogato to PyCs to two homebrew systems, to Nikola,
and have never lost a file, a URL, or a comment. That's because I have always
had my own data in a format of my choice.
With Nikola, you own your files, and you can do anything with them.
You will want to do things like "link from one post to another" or "link to an image gallery",
etc. Sure, you can just figure out the URLs for each thing and use that. Or you can use
Nikola's special link URLs. Those are done using the syntax link://kind/name and
a full list of the included ones is here (BTW, I linked
to that using link://slug/path-handlers).
Note that magic links with spaces won’t work with some input formats (eg.
reST), so you should use slugs there (eg. link://tag/some-tag instead of
link://tag/Some Tag)
To create a new post, the easiest way is to run nikola new_post. You will
be asked for a title for your post, and it will tell you where the post's file
is located.
By default, that file will contain also some extra information about your post ("the metadata").
It can be placed in a separate file by using the -2 option, but it's generally
easier to keep it in a single location.
The contents of your post have to be written (by default) in reStructuredText
but you can use a lot of different markups using the -f option.
Currently, Nikola supports reStructuredText, Markdown, Jupyter Notebooks, HTML as input,
can also use Pandoc for conversion, and has support for BBCode, CreoleWiki, txt2tags, Textile
and more via plugins — for more details, read the input format documentation.
You can learn reStructuredText syntax with the reST quickstart.
Please note that Nikola does not support encodings other than UTF-8. Make sure
to convert your input files to that encoding to avoid issues. It will prevent
bugs, and Nikola will write UTF-8 output anyway.
You can control what markup compiler is used for each file extension with the COMPILERS
option. The default configuration expects them to be placed in posts but that can be
changed (see below, the POSTS and PAGES options)
This is how it works:
$ nikola new_post
Creating New Post-----------------Title: How to make moneyScanning posts....done!INFO: new_post: Your post's text is at: posts/how-to-make-money.rst
The content of that file is as follows:
.. title: How to make money.. slug: how-to-make-money.. date: 2012-09-15 19:52:05 UTC.. tags:.. link:.. description:.. type: textWrite your post here.
You can edit these files with your favorite text editor, and once you are happy
with the contents, generate the pages using nikola build.
The post page is generated by default using the post.tmpl template, which you can use
to customize the output. You can also customize paths and the template filename
itself — see How does Nikola decide where posts should go?
Slug of the post. Used as the last component of the page URL. We recommend
and default to using a restricted character set (a-z0-9-_) because
other symbols may cause issues in URLs. (required)
date
Date of the post, defaults to now. Multiple date formats are accepted.
Adding a timezone is recommended. (required for posts)
tags
Comma-separated tags of the post.
status
Can be set to published (default), featured, draft, or private.
has_math
If set to true or yes, MathJax resp. KaTeX support is enabled
for this post.
category
Like tags, except each post can have only one, and they usually have
more descriptive names.
guid
String used as GUID in RSS feeds and as ID in Atom feeds instead of the
permalink.
link
Link to original source for content. May be displayed by some themes.
description
Description of the post. Used in <meta> tags for SEO.
type
Type of the post. See Post Types for details. Whatever you set here
(prepended with post-) will become a CSS class of the <article>
element for this post. Defaults to text (resulting in a post-text
class)
Set "True" if you do not want to see the page title as a
heading of the output html file (does not work for posts).
hyphenate
Set "True" if you want this document to be hyphenated even if you have
hyphenation disabled by default.
nocomments
Set to "True" to disable comments. Example:
pretty_url
Set to "False" to disable pretty URL for this page. Example:
previewimage
Designate a preview or other representative image path relative to BASE_URL
for use with Open Graph for posts. Adds the image when sharing on social
media, feeds, and many other uses.
The image can be of any size and dimension (services will crop and adapt)
but should less than 1 MB and be larger than 300x300 (ideally 600x600).
This image is displayed by bootblog4 for featured posts (see Featured
Posts for details).
template
Change the template used to render this page/post specific page. That
template needs to either be part of the theme, or be placed in a
templates/ folder inside your site.
.. template: foobar.tmpl
updated
The last time this post was updated, defaults to the post’s date
metadata value. It is not displayed by default in most themes, including
the defaults — you can use post.formatted_updated(date_format) (and
perhaps check if post.updated != post.date) in your post template to
show it.
To add these metadata fields to all new posts by default, you can set the
variable ADDITIONAL_METADATA in your configuration. For example, you can
add the author metadata to all new posts by default, by adding the following
to your configuration:
ADDITIONAL_METADATA={'author':'John Doe'}
url_type
Change the URL_TYPE setting for the given page only. Useful for eg. error
pages which cannot use relative URLs.
Metadata can be in different formats.
Current Nikola versions experimentally supports other metadata formats that make it more compatible with
other static site generators. The currently supported metadata formats are:
reST-style comments (.. name: value — default format)
Two-file format (reST-style, YAML, TOML)
Jupyter Notebook metadata
YAML, between --- (Jekyll, Hugo)
TOML, between +++ (Hugo)
reST docinfo (Pelican)
Markdown metadata extension (Pelican)
HTML meta tags (Pelican)
You can add arbitrary meta fields in any format.
When you create new posts, by default the metadata will be created as reST style comments.
If you prefer a different format, you can set the METADATA_FORMAT to one of these values:
"Nikola": reST comments, wrapped in a HTML comment if needed (default)
"YAML": YAML wrapped in "---"
"TOML": TOML wrapped in "+++"
"Pelican": Native markdown metadata or reST docinfo fields. Nikola style for other formats.
Meta information can also be specified in separate .meta files. Those support reST-style metadata, with names and custom fields. They look like the beginning of our reST files:
.. title: How to make money
.. slug: how-to-make-money
.. date: 2012-09-15 19:52:05 UTC
You can also use YAML or TOML metadata inside those (with the appropriate markers).
Jupyter posts can store meta information inside .ipynb files by using the nikola key inside notebook metadata. It can be edited by using Edit → Edit Notebook Metadata in Jupyter. Note that values are currently only strings. Sample metadata (Jupyter-specific information omitted):
{"nikola":{"title":"How to make money","slug":"how-to-make-money","date":"2012-09-15 19:52:05 UTC"}}
Nikola can extract metadata from reStructuredText docinfo fields and the document itself, too:
How to make money=================:slug: how-to-make-money
:date: 2012-09-15 19:52:05 UTC
To do this, you need USE_REST_DOCINFO_METADATA = True in your conf.py,
and Nikola will hide the docinfo fields in the output if you set
HIDE_REST_DOCINFO = True.
Note
Keys are converted to lowercase automatically.
This setting also means that the first heading in a post will be removed
and considered a title. This is important if you’re mixing metadata
styles. This can be solved by putting a reST comment before your title.
For HTML source files, metadata will be extracted from meta tags, and the title from the title tag.
Following Pelican's behaviour, tags can be put in a "tags" meta tag or in a "keywords" meta tag. Example:
<html><head><title>My super title</title><metaname="tags"content="thats, awesome"/><metaname="date"content="2012-07-09 22:28"/><metaname="modified"content="2012-07-10 20:14"/><metaname="category"content="yeah"/><metaname="authors"content="Conan Doyle"/><metaname="summary"content="Short version for index and feeds"/></head><body> This is the content of my super blog post.
</body></html>
If you import posts from other engines, those may not work with Nikola out of the box due to differing names. However, you can create a mapping to convert meta field names from those formats into what Nikola expects.
The following source names are supported: yaml, toml, rest_docinfo, markdown_metadata.
Additionally, you can use METADATA_VALUE_MAPPING to perform any extra conversions on metadata for all posts of a given format (nikola metadata is also supported). A few examples:
METADATA_VALUE_MAPPING={"yaml":{"keywords":lambdavalue:', '.join(value)},# yaml: 'keywords' list -> str"nikola":{"widgets":lambdavalue:value.split(', '),# nikola: 'widgets' comma-separated string -> list"tags":str.lower# nikola: force lowercase 'tags' (input would be string)}}
If you are writing a multilingual site, you can also create a per-language
post file (for example: how-to-make-money.es.txt with the default TRANSLATIONS_PATTERN, see below).
This one can replace metadata of the default language, for example:
The translated title for the post or page
A translated version of the page name
The pattern used for finding translations is controlled by the
TRANSLATIONS_PATTERN variable in your configuration file.
The default is to put the language code before the file extension,
so the German translation of some_file.rst should be named
some_file.de.rst. This is because the TRANSLATIONS_PATTERN variable is by
default set to:
TRANSLATIONS_PATTERN="{path}.{lang}.{ext}"
Considered languages
Nikola will only look for translation of input files for languages
specified in the TRANSLATIONS variable.
In case you translate your posts, you might also want to adjust various
other settings so that the generated URLs match the translation. You can
find most places in conf.py by searching for (translatable). For example,
you might want to localize /categories/ (search for TAG_PATH), /pages/
and /posts/ (search for POSTS and PAGES, or see the next section), or
how to adjust the URLs for subsequent pages for indexes (search for
INDEXES_PRETTY_PAGE_URL).
Nikola supports multiple languages for a post (we have almost 50 translations!). If you wish to
add support for more languages, check out the Transifex page for Nikola
The place where the post will be placed by new_post (the first one that
matches the given format) and the final post destination (the first one that
matches a given file) is based on the POSTS and PAGES configuration
options. The exact mechanism is explained above the config options in the
conf.py file, and also reproduced below:
# POSTS and PAGES contains (wildcard, destination, template) tuples.## The wildcard is used to generate a list of post source files# (whatever/thing.rst, for example).## That fragment could have an associated metadata file (whatever/thing.meta),# and optionally translated files (example for Spanish, with code "es"):# whatever/thing.es.rst and whatever/thing.es.meta## This assumes you use the default TRANSLATIONS_PATTERN.## From those files, a set of HTML fragment files will be generated:# cache/whatever/thing.html (and maybe cache/whatever/thing.html.es)## These files are combined with the template to produce rendered# pages, which will be placed at# output/TRANSLATIONS[lang]/destination/pagename.html## where "pagename" is the "slug" specified in the metadata file.# The page might also be placed in /destination/pagename/index.html# if PRETTY_URLS are enabled.## The difference between POSTS and PAGES is that POSTS are added# to feeds, indexes, tag lists and archives and are considered part# of a blog, while PAGES are just independent HTML pages.## Finally, note that destination can be translated, i.e. you can# specify a different translation folder per language. Example:# PAGES = (# ("pages/*.rst", {"en": "pages", "de": "seiten"}, "page.tmpl"),# ("pages/*.md", {"en": "pages", "de": "seiten"}, "page.tmpl"),# )POSTS=(("posts/*.rst","posts","post.tmpl"),("posts/*.txt","posts","post.tmpl"),("posts/*.html","posts","post.tmpl"),)PAGES=(("pages/*.rst","pages","page.tmpl"),("pages/*.txt","pages","page.tmpl"),("pages/*.html","pages","page.tmpl"),)
POSTS and PAGES are not flat!
Even if the syntax may suggest you can't, you can create any directory structure you want
inside posts/ or pages/ and it will be reflected in the output. For example,
posts/foo/bar.txt would produce output/posts/foo/bar.html, assuming the slug is also bar.
If you have PRETTY_URLS enabled, that would be output/posts/foo/bar/index.html.
Warning
Removing the .rst entries is not recommended. Some features (eg.
shortcodes) may not work properly if you do that.
new_post will use the first path in POSTS (or PAGES if -p is
supplied) that ends with the extension of your desired markup format (as
defined in COMPILERS in conf.py) as the directory that the new post will be
written into. If no such entry can be found, the post won’t be created.
The new_post command supports some options:
$ nikola help new_post
Purpose: create a new blog post or site page
Usage:   nikola new_post [options] [path]

Options:
  -p, --page                Create a page instead of a blog post. (see also: `nikola new_page`)
  -t ARG, --title=ARG       Title for the post.
  -a ARG, --author=ARG      Author of the post.
  --tags=ARG                Comma-separated tags for the post.
  -1                        Create the post with embedded metadata (single file format)
  -2                        Create the post with separate metadata (two file format)
  -e                        Open the post (and meta file, if any) in $EDITOR after creation.
  -f ARG, --format=ARG      Markup format for the post (use --available-formats for list)
  -F, --available-formats   List all available input formats
  -s                        Schedule the post based on recurrence rule
  -i ARG, --import=ARG      Import an existing file instead of creating a placeholder
  -d, --date-path           Create post with date path (eg. year/month/day, see NEW_POST_DATE_PATH_FORMAT in config)
The optional path parameter tells Nikola exactly where to put it instead of guessing from your config.
So, if you do nikola new_post posts/random/foo.txt you will have a post in that path, with
"foo" as its slug. You can also provide a directory name, in which case Nikola
will append the file name for you (generated from title).
The -d,--date-path option automates creation of year/month/day or
similar directory structures. It can be enabled on a per-post basis, or you can
use it for every post if you set NEW_POST_DATE_PATH = True in conf.py.
# Use date-based path when creating posts?# Can be enabled on a per-post basis with `nikola new_post -d`.# NEW_POST_DATE_PATH = False# What format to use when creating posts with date paths?# Default is '%Y/%m/%d', other possibilities include '%Y' or '%Y/%m'.# NEW_POST_DATE_PATH_FORMAT = '%Y/%m/%d'
You may not want to show the complete content of your posts either on your
index page or in RSS feeds, but to display instead only the beginning of them.
If it's the case, you only need to add a "magical comment" TEASER_END or
END_TEASER in your post.
In reStructuredText:
.. TEASER_END
In Markdown (or basically, the resulting HTML of any format):
<!-- TEASER_END -->
By default all your RSS feeds will be shortened (they'll contain only teasers)
whereas your index page will still show complete posts. You can change
this behavior with your conf.py: INDEX_TEASERS defines whether index
page should display the whole contents or only teasers. FEED_TEASERS
works the same way for your Atom and RSS feeds.
By default, teasers will include a "read more" link at the end. If you want to
change that text, you can use a custom teaser:
.. TEASER_END: click to read the rest of the article
You can override the default value for TEASER_END in conf.py — for
example, the following example will work for .. more, and will be
compatible with both WordPress and Nikola posts:
Or you can completely customize the link using the READ_MORE_LINK option.
# A HTML fragment with the Read more... link.# The following tags exist and are replaced for you:# {link} A link to the full post page.# {read_more} The string “Read more” in the current language.# {{ A literal { (U+007B LEFT CURLY BRACKET)# }} A literal } (U+007D RIGHT CURLY BRACKET)# READ_MORE_LINK = '<p class="more"><a href="{link}">{read_more}…</a></p>'
If you set the status metadata field of a post to draft, it will not be shown
in indexes and feeds. It will be compiled, and if you deploy it it will be made
available, so use with care. If you wish your drafts to be not available in your
deployed site, you can set DEPLOY_DRAFTS = False in your configuration. This will
not work if lazily include nikola build in your DEPLOY_COMMANDS.
Also if a post has a date in the future, it will not be shown in indexes until
you rebuild after that date. This behavior can be disabled by setting
FUTURE_IS_NOW = True in your configuration, which will make future posts be
published immediately. Posts dated in the future are not deployed by default
(when FUTURE_IS_NOW = False). To make future posts available in the
deployed site, you can set DEPLOY_FUTURE = True in your configuration.
Generally, you want FUTURE_IS_NOW and DEPLOY_FUTURE to be the same value.
If you set the status metadata field of a post to private, it will not be shown
in indexes and feeds. It will be compiled, and if you deploy it it will be made
available, so it will not generate 404s for people who had linked to it.
Some themes, bootblog4 in particular, support featured posts. To mark a
post as featured, simply set the status meta field to featured. All
featured posts are available in index templates in a featured
list, but only if this is the main blog index.
For bootblog4, you can display up to three posts as featured: one can be shown
in a large gray box (jumbotron), and two more can appear in small white
cards. In order to enable this feature, you need to add THEME_CONFIG to
your configuration, and set it up properly:
THEME_CONFIG={DEFAULT_LANG:{# Show the latest featured post in a large box, with the previewimage as its background.'featured_large':True,# Show the first (remaining) two featured posts in small boxes.'featured_small':True,# Show featured posts on mobile.'featured_on_mobile':True,# Show image in `featured_large` on mobile.# `featured_small` displays them only on desktop.'featured_large_image_on_mobile':False,# Strip HTML from featured post text.'featured_strip_html':True,# Contents of the sidebar, If empty, the sidebar is not displayed.'sidebar':''}}
You can pick betweeen (up to) 1, 2, or 3 featured posts. You can mix
featured_large and featured_small, rest assured that Nikola will always
display the latest posts no matter what setup you choose. If only one posts
qualifies for the small cards, one card taking up all the width will appear.
Both featured box formats display an image to the right. You can set it by changing the previewimage meta value to the full path to the image (eg. .. previewimage: /images/featured1.png). This works best with images in portrait orientation.
Note that, due to space constraints, only the large box may show the image on
mobile, below the text (this behavior can be disbled). Small boxes never
display images on mobile. In particular: xs and sm display only the
large image, and only if configured; md displays only the large image,
lg displays all three images.
The boxes display only the teaser. We recommend keeping it short so
you don’t get an ugly scrollbar.
Finally, here’s an example (you’ll need to imagine a scrollbar in the right box
yourself):
Some blogs tend to have new posts based on a schedule (for example,
every Mon, Wed, Fri) but the blog authors don't like to manually
schedule their posts. You can schedule your blog posts based on a
rule, by specifying a rule in the SCHEDULE_RULE in your
configuration. You can either post specific blog posts according to
this schedule by using the --schedule flag on the new_post
command or post all new posts according to this schedule by setting
SCHEDULE_ALL = True in your configuration. (Note: This feature
requires that the FUTURE_IS_NOW setting is set to False)
For example, if you would like to schedule your posts to be on every
Monday, Wednesday and Friday at 7am, add the following
SCHEDULE_RULE to your configuration:
For more details on how to specify a recurrence rule, look at the
iCal specification.
Or if you are scared of this format, many calendaring applications (eg. Google
Calendar) offer iCal exports, so you can copy-paste the repeat rule from a
generated iCal (.ics) file (which is a human-readable text file).
Say, you get a free Sunday, and want to write a flurry of new posts,
or at least posts for the rest of the week, you would run the
new_post command with the --schedule flag, as many times as
you want:
$ nikola new_post --schedule
# Creates a new post to be posted on Monday, 7am.
$ nikola new_post -s
# Creates a new post to be posted on Wednesday, 7am.
$ nikola new_post -s
# Creates a new post to be posted on Friday, 7am.
...
All these posts get queued up according to your schedule, but note
that you will anyway need to build and deploy your site for the posts
to appear online. You can have a cron job that does this regularly.
Nikola supports specifying post types, just like Tumblr does. Post
types affect the look of your posts, by adding a post-YOURINPUTHERE
CSS class to the post. Each post can have one and exactly one type. Nikola
styles the following types in the default themes:
Indexes are put in the INDEX_PATH directory, which defaults to an empty
string (site root). The “main” index is index.html, and all the further
indexes are index-*.html, respectively.
By default, 10 posts are displayed on an index page. This can be changed with
INDEX_DISPLAY_POST_COUNT. Indexes can show full posts or just the teasers,
as controlled by the INDEX_TEASERS setting (defaults to False).
Titles of the pages can be controlled by using INDEXES_TITLES,
INDEXES_PAGES and INDEXES_PAGES_MAIN settings.
Categories and tags use simple lists by default that show only titles and
dates; however, you can switch them to full indexes by using
CATEGORY_PAGES_ARE_INDEXES and TAG_PAGES_ARE_INDEXES, respectively.
Something similar happens with authors. To use full indexes in authors, set
AUTHOR_PAGES_ARE_INDEXES to True.
Nikola uses static indexes by default. This means that index-1.html has
the oldest posts, and the newest posts past the first 10 are in
index-N.html, where N is the highest number. Only the page with the
highest number and the main page (index-N.html and index.html) are
rebuilt (the others remain unchanged). The page that appears when you click
Older posts on the index page, index-N.html, might contain less than 10
posts if there are not enough posts to fill up all pages.
This can be disabled by setting INDEXES_STATIC to False. In that mode,
index-1.html contains all the newest posts past the first 10 and will
always contain 10 posts (unless you have less than 20). The last page,
index-N.html, contains the oldest posts, and might contain less than 10
posts. This is how many blog engines and CMSes behave. Note that this will
lead to rebuilding all index pages, which might be a problem for larger blogs
(with a lot of index pages).
There are two taxonomy systems in Nikola, or two ways to organize posts. Those are tags and categories. They are visible on the Tags and Categories page, by default available at /categories/. Each tag/category has an index page and feeds.
Tags are the smallest and most basic of the taxonomy items. A post can have multiple tags, specified using the tags metadata entry (comma-separated). You should provide many tags to help your readers, and perhaps search engines, find content on your site.
Please note that tags are case-sensitive and that you cannot have two tags that differ only in case/punctuation (eg. using nikola in one post and Nikola in another will lead to a crash):
ERROR: Nikola: You have tags that are too similar: Nikola and nikola
ERROR: Nikola: Tag Nikola is used in: posts/second-post.rst
ERROR: Nikola: Tag nikola is used in: posts/1.rst
You can also generate a tag cloud with the tx3_tag_cloud plugin or get a data file for a tag cloud with the tagcloud plugin.
The next unit for organizing your content are categories. A post can have only one category, specified with the category meta tag. They are displayed alongside tags. You can have categories and tags with the same name (categories’ RSS and HTML files are prefixed with cat_ by default).
Categories are handy to organize different parts of your blog, parts that are about different topics. Unlike tags, which you should have tens (hundreds?) of, the list of categories should be shorter.
Nikola v7 used to support a third taxonomy, called sections. Those have been removed, but all the functionality can be recreated by using the CATEGORY_DESTPATH settings.
They use the page.tmpl template instead of post.tmpl by default
The default configuration expects the page's metadata and text files to be on the
pages folder, but that can be changed (see PAGES option above).
You can create the page's files manually or use the new_post command
with the -p option, which will place the files in the folder that
has use_in_feed set to False.
In some places (including default directories and templates), pages are called
stories for historic reasons. Both are synonyms for the same thing: pages
that are not blog posts.
In order to use input formats other than reStructuredText, you need some extra
setup.
Make sure you have the compiler for the input format you want. Some
input formats are supported out-of-the-box, but others must be installed from
the Plugins repository. You may also need some extra dependencies. You
will get helpful errors if you try to build when missing something.
You must ensure the compiler and your desired input file extension is included
in the COMPILERS dict and does not conflict with any other format. This
is extremely important for the pandoc compiler.
Finally, you must configure the POSTS and PAGES tuples. Follow the
instructions and the format set by pre-existing entries. Make sure to use
the same extension as is set in COMPILERS and configure the outputs
properly.
To use Markdown in your posts/pages, make sure markdown is in your
COMPILERS and that at least one of your desired extensions is defined in
POSTS and PAGES.
You can use Python-Markdown extensions by setting the MARKDOWN_EXTENSIONS
config option:
Nikola comes with some Markdown Extensions built-in and enabled by default,
namely a gist directive, a podcast directive, and ~~strikethrough~~ support.
To use PHP in your posts/pages (inside your site, with the theme and
everything), make sure php is in your COMPILERS and that the .php
extension is defined in POSTS and PAGES.
To use PHP as standalone files (without any modifications), put them in
files/ (or whatever FILES_FOLDERS is configured to).
To use Pandoc, you must uncomment the entry in COMPILERS and set the
extensions list to your desired extensions while also removing them from their
original compilers. The input format is inferred from the extension by Pandoc.
Using Pandoc for reStructuredText, Markdown and other input formats that have a
standalone Nikola plugin is not recommended as it disables plugins and
extensions that are usually provided by Nikola.
In your content files, a shortcode can be called by using this form:
{{% name parameters %}}
Shortcode parameters are space delimited. Parameters with spaces can be quoted (or backslash escaped).
The first word is always the name of the shortcode. Parameters follow the name. Depending upon how the shortcode is defined, the parameters may be named, positional or both. The format for named parameters models that of HTML with the format name="value".
Some shortcodes use or require closing shortcodes. Like HTML, the opening and closing shortcodes match (name only), the closing being prepended with a slash.
Example of a paired shortcode (note that we don't have a highlight shortcode yet ;-):
{{% highlight python %}} A bunch of code here {{% /highlight %}}
Shortcodes and reStructuredText
In reStructuredText shortcodes may fail because docutils turns URL into links and everything breaks.
For some shortcodes there are alternative docutils directives (example, you can use the media
directive instead of the media shortcode.
Also, you can use the shortcode role:
:sc:`{{% shortcode here %}}`
That role passes text unaltered, so shortcodes behave correctly.
Passes the content along, mostly used so I can write this damn section and you can see the shortcodes instead
of them being munged into shortcode output. I can't show an example because Inception.
thumbnail
Display image thumbnails, with optional captions. Examples:
If you put a template in shortcodes/ called mycode.tmpl then Nikola
will create a shortcode called mycode you can use. Any options you pass to
the shortcode will be available as variables for that template. Non-keyword
options will be passed in a tuple variable named _args.
The post in which the shortcode is being used is available as the post
variable, so you can access the title as post.title, and data loaded
via the data field in the metadata using post.data(key).
If you use the shortcode as paired, then the contents between the paired tags
will be available in the data variable. If you want to access the Nikola
object, it will be available as site. Use with care :-)
Note
Template-based shortcodes use the same template engine as your site’s theme.
In that case, the template engine used will be your theme's and the arguments you pass,
as well as the global context from your conf.py, are available to the template you
are creating.
You can use anything defined in your configuration's GLOBAL_CONTEXT as
variables in your shortcode template, with a caveat: Because of an unfortunate
implementation detail (a name conflict), data is called global_data
when used in a shortcode.
If you have some template code that you want to appear in both a template and
shortcode, you can put the shared code in a separate template and import it in both
places. Shortcodes can import any template inside templates/ and themes,
and call any macros defined in those.
For example, if you define a macro foo(x, y) in
templates/shared_sc.tmpl, you can include shared_foo.tmpl in
templates/special_post.tmpl and shortcodes/foo.tmpl and then call the
${shared_foo.foo(x, y)} macro.
There is a GLOBAL_CONTEXT field in your conf.py where you can
put things you want to make available to your templates.
It will also contain things you put in a data/ directory within your
site. You can use JSON, YAML or TOML files (with the appropriate file
extensions: json/js, yaml/yml, toml/tml) that decode to Python dictionaries.
For example, if you create data/foo.json containing this:
{"bar":"baz"}
Then your templates can use things like ${data['foo']['bar']} and
it will be replaced by "baz".
Individual posts can also have a data file. Those are specified using the
data meta field (path relative to conf.py, can be different in
different post languages). Those are accessible as eg.
${post.data['bar']} in templates. Template-based shortcodes are a
good idea in this case.
Data files can be useful for eg. auto-generated sites, where users provide
JSON/YAML/TOML files and Nikola generates a large page with data from all data
files. (This is especially useful with some automatic rebuild feature, like
those documented in Deployment)
Data files are also available as global_data, to avoid name conflicts in
shortcodes. (global_data works everywhere.)
If you need a page to be available in more than one place, you can define redirections
in your conf.py:
# A list of redirection tuples, [("foo/from.html", "/bar/to.html")].## A HTML file will be created in output/foo/from.html that redirects# to the "/bar/to.html" URL. notice that the "from" side MUST be a# relative URL.## If you don't need any of these, just set to []REDIRECTIONS=[("index.html","/weblog/index.html")]
It's better if you can do these using your web server's configuration, but if
you can't, this will work.
The configuration file is called conf.py and can be used to customize a lot of
what Nikola does. Its syntax is python, but if you don't know the language, it
still should not be terribly hard to grasp.
The default conf.py you get with Nikola should be fairly complete, and is quite
commented.
You surely want to edit these options:
# Data about this siteBLOG_AUTHOR="Your Name"# (translatable)BLOG_TITLE="Demo Site"# (translatable)SITE_URL="https://getnikola.com/"BLOG_EMAIL="joe@demo.site"BLOG_DESCRIPTION="This is a demo site for Nikola."# (translatable)
Some options are marked with a (translatable) comment above or right next to
them. For those options, two types of values can be provided:
a string, which will be used for all languages
a dict of language-value pairs, to have different values in each language
Note
It is possible to load the configuration from another file by specifying
--conf=path/to/other.file on Nikola's command line. For example, to
build your blog using the configuration file configurations/test.conf.py,
you have to execute nikola build --conf=configurations/test.conf.py.
There are lots of things you can do to personalize your website, but let's see
the easy ones!
CSS tweaking
Using the default configuration, you can create a assets/css/custom.css
file under files/ or in your theme and then it will be loaded from the
<head> blocks of your site pages. Create it and put your CSS code there,
for minimal disruption of the provided CSS files.
If you feel tempted to touch other files in assets, you probably will be better off
with a custom theme.
If you want to use LESS or Sass for your custom CSS, or the theme you use
contains LESS or Sass code that you want to override, you will need to install
the LESS plugin or
SASS plugin create a less or
sass directory in your site root, put your .less or .scss files
there and a targets file containing the list of files you want compiled.
Template tweaking and creating themes
If you really want to change the pages radically, you will want to do a
custom theme.
Navigation Links
The NAVIGATION_LINKS option lets you define what links go in a sidebar or menu
(depending on your theme) so you can link to important pages, or to other sites.
The format is a language-indexed dictionary, where each element is a tuple of
tuples which are one of:
A (url, text) tuple, describing a link
A (((url, text), (url, text), (url, text)), title) tuple, describing a submenu / sublist.
Support for submenus is theme-dependent. Only one level of
submenus is supported.
Some themes, including the default Bootstrap theme, may
present issues if the menu is too large. (in Bootstrap, the navbar
can grow too large and cover contents.)
If you link to directories, make sure to follow STRIP_INDEXES. If
it’s set to True, end your links with a /, otherwise end them
with /index.html — or else they won’t be highlighted when active.
There’s also NAVIGATION_ALT_LINKS. Themes may display this somewhere
else, or not at all. Bootstrap puts it on the right side of the header.
The SEARCH_FORM option contains the HTML code for a search form based on
duckduckgo.com which should always work, but feel free to change it to
something else.
Footer
CONTENT_FOOTER is displayed, small at the bottom of all pages, I use it for
the copyright notice. The default shows a text formed using BLOG_AUTHOR,
BLOG_EMAIL, the date and LICENSE. Note you need to use
CONTENT_FOOTER_FORMATS instead of regular str.format or %-formatting,
for compatibility with the translatable settings feature.
BODY_END
This option lets you define a HTML snippet that will be added at the bottom of body.
The main usage is a Google analytics snippet or something similar, but you can really
put anything there. Good place for JavaScript.
SOCIAL_BUTTONS_CODE
The SOCIAL_BUTTONS_CODE option lets you define a HTML snippet that will be added
at the bottom of body. It defaults to a snippet for AddThis, but you can
really put anything there. See social_buttons.html for more details.
Any files you want to be in output/ but are not generated by Nikola (for
example, favicon.ico) should be placed in files/. Remember that you
can't have files that collide with files Nikola generates (it will give an
error).
Important
Don't put any files manually in output/. Ever. Really.
Maybe someday Nikola will just wipe output/ (when you run nikola check -f--clean-files) and then you will be sorry. So, please don't do that.
If you want to copy more than one folder of static files into output you can
change the FILES_FOLDERS option:
# One or more folders containing files to be copied as-is into the output.# The format is a dictionary of "source" "relative destination".# Default is:# FILES_FOLDERS = {'files': '' }# Which means copy 'files' into 'output'
If you prefer to have a custom appearance for your site, and modifying CSS
files and settings (see Customizing Your Site for details) is not enough,
you can create your own theme. See the Theming Nikola and
Creating a Theme for more details. You can put them in a themes/
folder and set THEME to the directory name. You can also put them in
directories listed in the EXTRA_THEMES_DIRS configuration variable.
There are a few themes for Nikola. They are available at
the Themes Index.
Nikola has a built-in theme download/install mechanism to install those themes
— the theme command:
$ nikola theme -l
Themes:-------blogtxtbootstrap3-gradients⋮⋮$ nikola theme -i blogtxt
[2013-10-12T16:46:13Z] NOTICE: theme: Downloading:https://themes.getnikola.com/v6/blogtxt.zip[2013-10-12T16:46:15Z] NOTICE: theme: Extracting: blogtxt into themes
And there you are, you now have themes/blogtxt installed. It's very
rudimentary, but it should work in most cases.
If you create a nice theme, please share it! You can do it as a pull
request in the GitHub repository.
One other option is to tweak an existing theme using a different color scheme,
typography and CSS in general. Nikola provides a subtheme command
to create a custom theme by downloading free CSS files from http://bootswatch.com
and http://hackerthemes.com
$ nikola subtheme -n custom_theme -s flatly -p bootstrap4
[2013-10-12T16:46:58Z] NOTICE: subtheme: Creating 'custom_theme' themefrom 'flatly' and 'bootstrap4'[2013-10-12T16:46:58Z] NOTICE: subtheme: Downloading:http://bootswatch.com/flatly/bootstrap.min.css[2013-10-12T16:46:58Z] NOTICE: subtheme: Downloading:http://bootswatch.com/flatly/bootstrap.css[2013-10-12T16:46:59Z] NOTICE: subtheme: Theme created. Change the THEME setting to "custom_theme" to use it.
Play with it, there's cool stuff there. This feature was suggested by
clodo.
If you can specify your deployment procedure as a series of commands, you can
put them in the DEPLOY_COMMANDS option, and run them with nikola deploy.
You can have multiple deployment presets. If you run nikola deploy, the
default preset is executed. You can also specify the names of presets
you want to run (eg. nikola deploy default, multiple presets are allowed).
One caveat is that if any command has a % in it, you should double them.
Here is an example, from my own site's deployment script:
Other interesting ideas are using
git as a deployment mechanism (or any other VCS
for that matter), using lftp mirror or unison, or Dropbox.
Any way you can think of to copy files from one place to another is good enough.
Nikola provides a separate command github_deploy to deploy your site to
GitHub Pages. The command builds the site, commits the output to a gh-pages
branch and pushes the output to GitHub. Nikola uses the ghp-import command for this.
In order to use this feature, you need to configure a few things first. Make
sure you have nikola and git installed on your PATH.
Initialize a Nikola site, if you haven’t already.
Initialize a git repository in your Nikola source directory by running:
GITHUB_DEPLOY_BRANCH is the branch where Nikola-generated HTML files
will be deployed. It should be gh-pages for project pages and
master for user pages (user.github.io).
GITHUB_SOURCE_BRANCH is the branch where your Nikola site source will be
deployed. We recommend and default to src.
GITHUB_REMOTE_NAME is the remote to which changes are pushed.
GITHUB_COMMIT_SOURCE controls whether or not the source branch is
automatically committed to and pushed. We recommend setting it to
True, unless you are automating builds with Travis CI.
Create a .gitignore file. We recommend adding at least the following entries:
cache
.doit.db
__pycache__
output
If you set GITHUB_COMMIT_SOURCE to False, you must switch to your source
branch and commit to it. Otherwise, this is done for you.
Run nikola github_deploy. This will build the site, commit the output
folder to your deploy branch, and push to GitHub. Your website should be up
and running within a few minutes.
If you want to use a custom domain, create your CNAME file in
files/CNAME on the source branch. Nikola will copy it to the
output directory. To add a custom commit message, use the -m option,
followed by your message.
If you want automated rebuilds and GitHub Pages deployment, allowing you to
blog from anywhere in the world, follow this guide:
Automating Nikola rebuilds with Travis CI.
By default it will use DISQUS, but you can change by setting COMMENT_SYSTEM
to one of "disqus", "intensedebate", "livefyre", "moot", "facebook", "isso" or "commento"
COMMENT_SYSTEM_ID
The value of COMMENT_SYSTEM_ID depends on what comment system you
are using and you can see it in the system's admin interface.
For DISQUS it's called the shortname
In IntenseDebate it's the IntenseDebate site acct
In LiveFyre it's the siteId
In Muut it's your username
For Facebook, you need to create an app (turn off sandbox mode!)
and get an App ID
For isso, it is the URL of isso (must be world-accessible, encoded with
Punycode (if using Internationalized Domain Names) and have a trailing slash,
default http://localhost:8080/)
For commento it's the URL of the commento instance as required by the serverUrl
parameter in commento's documentation.
To use comments in a visible site, you should register with the service and
then set the COMMENT_SYSTEM_ID option.
I recommend 3rd party comments, and specially DISQUS because:
It doesn't require any server-side software on your site
They offer you a way to export your comments, so you can take
them with you if you need to.
It's free.
It's damn nice.
You can disable comments for a post by adding a "nocomments" metadata field to it:
.. nocomments: True
DISQUS Support
In some cases, when you run the test site, you won't see the comments.
That can be fixed by adding the disqus_developer flag to the templates
but it's probably more trouble than it's worth.
Moot Support
Moot doesn't support comment counts on index pages, and it requires adding
this to your conf.py:
To create an image gallery, all you have to do is add a folder inside galleries,
and put images there. Nikola will take care of creating thumbnails, index page, etc.
If you click on images on a gallery, or on images with links in post, you will
see a bigger image, thanks to the excellent baguetteBox. If don’t want this behavior, add an
.islink class to your link. (The behavior is caused by <a
class="reference"> if you need to use it outside of galleries and reST
thumbnails.)
The gallery pages are generated using the gallery.tmpl template, and you can
customize it there (you could switch to another lightbox instead of baguetteBox, change
its settings, change the layout, etc.).
Images in galleries may be provided with captions and given a specific
ordering, by creating a file in the gallery directory called metadata.yml.
This YAML file should contain a name field for each image in the gallery
for which you wish to provide either a caption or specific ordering. You can also
create localized versions (metadata.xx.yml).
Only one metadata.yml is needed per gallery. Here is an example, showing names,
captions and ordering. caption and order are given special treatment,
anything else is available to templates, as keys of photo_array images.
---name:ready-for-the-acid-wash.jpg---name:almost-full.jpgcaption:The pool is now almost full---name:jumping-in.jpgcaption:We're enjoying the new pool alreadyorder:4---name:waterline-tiles.jpgorder:2custom:metadata is supported---
Images to be used in normal posts can be placed in the images folder. These
images will be processed and have thumbnails created just as for galleries, but will
then be copied directly to the corresponding path in the output directory, so you
can reference it from whatever page you like, most easily using the thumbnail
reST extension. If you don't want thumbnails, just use the files folder instead.
The conf.py options affecting images and gallery pages are these:
# One or more folders containing galleries. The format is a dictionary of# {"source": "relative_destination"}, where galleries are looked for in# "source/" and the results will be located in# "OUTPUT_PATH/relative_destination/gallery_name"# Default is:GALLERY_FOLDERS={"galleries":"galleries"}# More gallery options:THUMBNAIL_SIZE=180MAX_IMAGE_SIZE=1280USE_FILENAME_AS_TITLE=TrueEXTRA_IMAGE_EXTENSIONS=[]# If set to False, it will sort by filename instead. Defaults to TrueGALLERY_SORT_BY_DATE=True# Folders containing images to be used in normal posts or pages.# IMAGE_FOLDERS is a dictionary of the form {"source": "destination"},# where "source" is the folder containing the images to be published, and# "destination" is the folder under OUTPUT_PATH containing the images copied# to the site. Thumbnail images will be created there as well.IMAGE_FOLDERS={'images':'images'}# Images will be scaled down according to IMAGE_THUMBNAIL_SIZE and MAX_IMAGE_SIZE# options, but will have to be referenced manually to be visible on the site# (the thumbnail has ``.thumbnail`` added before the file extension by default,# but a different naming template can be configured with IMAGE_THUMBNAIL_FORMAT).IMAGE_THUMBNAIL_SIZE=400IMAGE_THUMBNAIL_FORMAT='{name}.thumbnail{ext}'
If you add a reST file in galleries/gallery_name/index.txt its contents will be
converted to HTML and inserted above the images in the gallery page. The
format is the same as for posts.
If you add some image filenames in galleries/gallery_name/exclude.meta, they
will be excluded in the gallery page.
If USE_FILENAME_AS_TITLE is True the filename (parsed as a readable string)
is used as the photo caption. If the filename starts with a number, it will
be stripped. For example 03_an_amazing_sunrise.jpg will be render as An amazing sunrise.
Here is a demo gallery of historic, public domain Nikola
Tesla pictures taken from this site.
Assuming that you have your pictures stored in a folder called images (as configured above),
you can embed the same in your posts with the following reST directive:
..image:: /images/tesla.jpg
Which is equivalent to the following HTML code:
<imgsrc="/images/tesla.jpg">
Please take note of the leading forward-slash / which refers to the root
output directory. (Make sure to use this even if you’re not deploying to
web server root.)
You can also use thumbnails with the .. thumbnail:: reST directive. For
more details, and equivalent HTML code, see Thumbnails.
Your images contain a certain amount of extra data besides the image itself,
called the EXIF metadata.
It contains information about the camera you used to take the picture, when it was taken,
and maybe even the location where it was taken.
This is both useful, because you can use it in some apps to locate all the pictures taken
in a certain place, or with a certain camera, but also, since the pictures Nikola
publishes are visible to anyone on the Internet, a privacy risk worth considering
(Imagine if you post pictures taken at home with GPS info, you are publishing your
home address!)
Nikola has some support for managing it, so let's go through a few scenarios to
see which one you prefer.
Do this if you really know what you are doing. EXIF data comes separated in a few IFD blocks.
The most common ones are:
0th
Information about the image itself
Exif
Information about the camera and the image
1st
Information about embedded thumbnails (usually nothing)
thumbnail
An embedded thumbnail, in JPEG format (usually nothing)
GPS
Geolocation information about the image
Interop
Not too interesting at this point.
Each IFD in turn contains a number of tags. For example, 0th contains a ImageWidth tag.
You can tell Nikola exactly which IFDs to keep, and within each IFD, which tags to keep,
using the EXIF_WHITELIST option.
Your images may contain ICC profiles. These describe the color space in which the images were created or captured.
Most desktop web browsers can use embedded ICC profiles to display images accurately. As of early 2018 few mobile browsers consider ICC profiles when displaying images. A notable exception is Safari on iOS.
By default Nikola strips out ICC profiles when preparing images for your posts and galleries. If you want Nikola to preserve ICC profiles, add this in your conf.py:
PRESERVE_ICC_PROFILES=True
You may wish to do this if, for example, your site contains JPEG images that use a wide-gamut profile such as "Display P3".
You can apply post processing to the files in your site, in order to optimize them
or change them in arbitrary ways. For example, you may want to compress all CSS
and JS files using yui-compressor.
To do that, you can use the provided helper adding this in your conf.py:
Where "filters.yui_compressor" points to a helper function provided by Nikola in the
filters module. You can replace that with strings describing command lines, or
arbitrary python functions.
If there's any specific thing you expect to be generally useful as a filter, contact
me and I will add it to the filters library so that more people use it.
The currently available filters are:
Creating your own filters
You can use any program name that works in place as a filter, like sed -i
and you can use arbitrary Python functions as filters, too.
If your program doesn't run in-place, then you can use Nikola's runinplace function (from the filters module).
For example, this is how the yui_compressor filter is implemented:
You can turn any function into a filter using apply_to_text_file (for
text files to be read in UTF-8) and apply_to_binary_file (for files to
be read in binary mode).
As a silly example, this would make everything uppercase and totally break
your website:
Additionally, you can provide a custom list of XPath expressions which should be used for finding headers ({hx} is replaced by headers h1 through h6).
This is required if you use a custom theme that does not use "e-contententry-content" as a class for post and page contents.
Prevent duplicated IDs in HTML output. An incrementing counter is added to
offending IDs. If used alongside add_header_permalinks, it will fix
those links (it must run after that filter)
IDs are numbered from the bottom up, which is useful for indexes (updates
appear at the top). There are exceptions, which may be configured using
DEDUPLICATE_IDS_TOP_CLASSES — if any of those classes appears sin the
document, the IDs are rewritten top-down, which is useful for posts/pages
(updates appear at the bottom).
Note that in rare cases, permalinks might not always be permanent in case
of edits.
One of the main goals of Nikola is to make your site fast and light. So here are a few
tips we have found when setting up Nikola with Apache. If you have more, or
different ones, or about other web servers, please share!
Use a speed testing tool. I used Yahoo's YSlow but you can use any of them, and
it's probably a good idea to use more than one.
Nikola supports math input via MathJax (by default) or KaTeX. It is activated
via the math roles and directives of reStructuredText and the usual LaTeX
delimiters for other input formats.
Nikola uses MathJax by default. If you want to use KaTeX (faster and prettier,
but may not support every feature yet), set USE_KATEX = True in
conf.py.
To use mathematics in a post, you must set the has_math metadata field
to true. (Exception: posts that are Jupyter Notebooks are automatically
marked as math)
By default, Nikola will accept \(...\) for inline math; \[...\] and
$$...$$ for display math. If you want to use the old $...$ syntax as well
(which may conflict with running text!), you need to use special config for
your renderer:
(Note: the previous paragraph uses invisible characters to prevent rendering
TeX for display, so don’t copy the examples with three dots to your posts)
Inline mathematics are produced using the reST math role or the LaTeX
backslash-parentheses delimiters:
Euler’s formula: \(e^{ix} = \cos x + i\sin x\)
In reST:
Euler’s formula: :math:`e^{ix} = \cos x + i\sin x`
In HTML and other input formats:
Euler’s formula: \(e^{ix} = \cos x + i\sin x\)
Note that some input formats (including Markdown) require using double
backslashes in the delimiters (\\(inlinemath\\)). Please check your
output first before reporting bugs.
Note that some input formats (including Markdown) require using double
backslashes in the delimiters (\\[displaymath\\]). Please check your
output first before reporting bugs.
Nikola supports the standard reStructuredText include directive, but with a
catch: filenames are relative to Nikola site root (directory with conf.py)
instead of the post location (eg. posts/ directory)!
To link to a YouTube video, you need the id of the video. For example, if the
URL of the video is http://www.youtube.com/watch?v=8N_tupPBtWQ what you need is
8N_tupPBtWQ
Once you have that, all you need to do is:
..youtube:: 8N_tupPBtWQ
Supported options: height, width, align (one of left,
center, right) — all are optional. Example:
To link to a Vimeo video, you need the id of the video. For example, if the
URL of the video is http://www.vimeo.com/20241459 then the id is 20241459
Once you have that, all you need to do is:
..vimeo:: 20241459
If you have internet connectivity when generating your site, the height and width of
the embedded player will be set to the native height and width of the video.
You can override this if you wish:
..vimeo:: 20241459
:height: 240
:width: 320
Supported options: height, width, align (one of left,
center, right) — all are optional.
This directive lets you share music from http://soundcloud.com You first need to get the
ID for the piece, which you can find in the "share" link. For example, if the
WordPress code starts like this:
The code directive has been included in docutils since version 0.9 and now
replaces Nikola's code-block directive. To ease the transition, two aliases
for code directive are provided: code-block and sourcecode:
..code-block:: python
:number-lines: print("Our virtues and our failings are inseparable")
To use this, you have to put your source code files inside listings or whatever folders
your LISTINGS_FOLDERS variable is set to fetch files from. Assuming you have a foo.py
inside one of these folders:
..listing:: foo.py python
Will include the source code from foo.py, highlight its syntax in python mode,
and also create a listings/foo.py.html page (or in another directory, depending on
LISTINGS_FOLDER) and the listing will have a title linking to it.
The stand-alone listings/ pages also support Jupyter notebooks, if they are
supported site-wide.
Listings support the same options reST includes support (including
various options for controlling which parts of the file are included), and also
a linenos option for Sphinx compatibility.
The LISTINGS_FOLDER configuration variable allows to specify a list of folders where
to fetch listings from together with subfolder of the output folder where the
processed listings should be put in. The default is, LISTINGS_FOLDERS = {'listings': 'listings'},
which means that all source code files in listings will be taken and stored in output/listings.
Extending LISTINGS_FOLDERS to {'listings': 'listings', 'code': 'formatted-code'}
will additionally process all source code files in code and put the results into
output/formatted-code.
Note
Formerly, start-at and end-at options were supported; however,
they do not work anymore (since v6.1.0) and you should now use start-after
and end-before, respectively. You can also use start-line and
end-line.
To include an image placed in the images folder (or other folders defined in IMAGE_FOLDERS), use the
thumbnail directive, like this:
..thumbnail:: /images/tesla.jpg
:alt: Nikola Tesla
The small thumbnail will be placed in the page, and it will be linked to the bigger
version of the image when clicked, using
baguetteBox by default. All options supported by
the reST image
directive are supported (except target). Providing alt is recommended,
as this is the image caption. If a body element is provided, the thumbnail will
mimic the behavior of the figure
directive instead:
..thumbnail:: /images/tesla.jpg
:alt: Nikola Tesla
Nikola Tesla, the man that invented the 20th century.
If you want to include a thumbnail in a non-reST post, you need to produce at
least this basic HTML:
The argument passed next to the directive (Bar in that example) is the type of chart, and can be one of
Line, StackedLine, Bar, StackedBar, HorizontalBar, XY, DateY, Pie, Radar, Dot, Funnel, Gauge, Pyramid. For
examples of what each kind of graph is, check here
It can take a lot of options to let you customize the charts (in the example, title and x_labels).
You can use any option described in the pygal docs
Finally, the content of the directive is the actual data, in the form of a label and
a list of values, one series per line.
You can also specify a :data_file: option as described in the documentation for the chart shortcut.
Any post or page that uses this directive will be considered out of date,
every time a post is added or deleted, causing maybe unnecessary rebuilds.
On the other hand, it will sometimes not be considered out of date if
a post content changes, so it can sometimes be shown outdated, in those
cases, use nikola build -a to force a total rebuild.
This directive can be used to generate a list of posts. You could use it, for
example, to make a list of the latest 5 blog posts, or a list of all blog posts
with the tag nikola:
Here are my 5 latest and greatest blog posts:
..post-list:::stop: 5
These are all my posts about Nikola:
..post-list:::tags: nikola
Using shortcode syntax (for other compilers):
{{% post-list stop=5 %}}{{% /post-list %}}
The following options are recognized:
startinteger
The index of the first post to show.
A negative value like -3 will show the last three posts in the
post-list.
Defaults to None.
stopinteger
The index of the last post to show.
A value negative value like -1 will show every post, but not the
last in the post-list.
Defaults to None.
reverseflag
Reverse the order of the post-list.
Defaults is to not reverse the order of posts.
sort: string
Sort post list by one of each post's attributes, usually title or a
custom priority. Defaults to None (chronological sorting).
date: string
Show posts that match date range specified by this option. Format:
comma-separated clauses (AND)
clause: attribute comparison_operator value (spaces optional)
attribute: year, month, day, hour, month, second, weekday, isoweekday; or empty for full datetime
comparison_operator: == != <= >= < >
value: integer, 'now' or dateutil-compatible date input
tagsstring [, string...]
Filter posts to show only posts having at least one of the tags.
Defaults to None.
require_all_tagsflag
Change tag filter behaviour to show only posts that have all specified tags.
Defaults to False.
categoriesstring [, string...]
Filter posts to show only posts having one of the categories.
Defaults to None.
slugsstring [, string...]
Filter posts to show only posts having at least one of the slugs.
Defaults to None.
post_type (or type)string
Show only posts, pages or all.
Replaces all. Defaults to posts.
allflag
(deprecated, use post_type instead)
Shows all posts and pages in the post list. Defaults to show only posts.
langstring
The language of post titles and links.
Defaults to default language.
templatestring
The name of an alternative template to render the post-list.
Defaults to post_list_directive.tmpl
idstring
A manual id for the post list.
Defaults to a random name composed by 'post_list_' + uuid.uuid4().hex.
The post list directive uses the post_list_directive.tmpl template file (or
another one, if you use the template option) to generate the list's HTML. By
default, this is an unordered list with dates and clickable post titles. See
the template file in Nikola's base theme for an example of how this works.
The list may fail to update in some cases, please run nikola build -a with
the appropriate path if this happens.
We recommend using pages with dates in the past (1970-01-01) to avoid
dependency issues.
If you are using this as a shortcode, flags (reverse, all) are meant to be used
with a True argument, eg. all=True.
nikola import_wordpress mysite.wordpress.2012-12-20.xml
After some time, this will create a new_site folder with all your data. It currently supports
the following:
All your posts and pages
Keeps “draft” status
Your tags and categories
Imports your attachments and fixes links to point to the right places
Will try to add redirects that send the old post URLs to the new ones
Will give you a URL map so you know where each old post was
This is also useful for DISQUS thread migration, or server-based 301
redirects!
Allows you to export your comments with each post
Exports information on attachments per post
There are different methods to transfer the content of your posts:
You can convert them to HTML with the WordPress page compiler plugin
for Nikola. This will format the posts including supported shortcodes
the same way as WordPress does. Use the --transform-to-html option
to convert your posts to HTML.
If you use this option, you do not need to install the plugin
permanently. You can ask Nikola to install the plugin into the subdirectory
plugins of the current working directory by specifying
the --install-wordpress-compiler option.
You can leave the posts the way they are and use the WordPress page
compiler plugin to render them when building your new blog. This also
allows you to create new posts using the WordPress syntax, or to manually
add more shortcode plugins later. Use the --use-wordpress-compiler
option to not touch your posts.
If you want to use this option, you have to install the plugin permanently.
You can ask Nikola to install the plugin into your new site by specifying
the --install-wordpress-compiler option.
You can let Nikola convert your posts to Markdown. This is not error
free, because WordPress uses some unholy mix of HTML and strange things.
This is the default option and requires no plugins.
You will find your old posts in new_site/posts/post-title.html in the first case,
new_site/posts/post-title.wp in the second case or new_site/posts/post-title.md
in the last case if you need to edit or fix any of them.
Please note that the page compiler currently only supports the [code] shortcode,
but other shortcodes can be supported via plugins.
Also note that the WordPress page compiler is licensed under GPL v2 since
it uses code from WordPress itself, while Nikola is licensed under the more
liberal MIT license.
This feature is a work in progress, and the only way to improve it is to have it used for
as many sites as possible and make it work better each time, so we are happy to get requests
about it.
The dump needs to be in 1.2 format. You can check by reading it, it should say
xmlns:excerpt="http://wordpress.org/export/1.2/excerpt/" near the top of the
file. If it says 1.1 instead of 1.2 you will have to update your
WordPress before dumping.
It is possible to either import into a location you desire or into an already existing Nikola site.
To do so you can specify a location after the dump:
$ nikola import_wordpress mysite.wordpress.2012-12-20.xml -o import_location
With this command Nikola will import into the folder import_location.
If the folder already exists Nikola will not overwrite an existing conf.py.
Instead a new file with a timestamp at the end of the filename will be created.
Nikola supports Twitter Card summaries, but they are disabled by default.
Twitter Cards enable you to show additional information in Tweets that link
to your content.
Nikola supports Twitter Cards.
They are implemented to use Open Graph tags whenever possible.
Images displayed come from the previewimage meta tag.
You can specify the card type by using the card parameter in TWITTER_CARD.
To enable and configure your use of Twitter Cards, please modify the
corresponding lines in your conf.py:
TWITTER_CARD={'use_twitter_cards':True,# enable Twitter Cards'card':'summary',# Card type, you can also use 'summary_large_image',# see https://dev.twitter.com/cards/types'site':'@website',# twitter nick for the website'creator':'@username',# Username for the content creator / author.}
You can create your own plugins (see Extending Nikola) and use them in your own
site by putting them in a plugins/ folder. You can also put them in
directories listed in the EXTRA_PLUGINS_DIRS configuration variable.
If you want extra plugins, there is also the Plugins Index.
Similarly to themes, there is a nice, built-in command to manage them —
plugin:
$ nikola plugin -l
Plugins:--------helloworldtags⋮⋮$ nikola plugin --install helloworld
[2013-10-12T16:51:56Z] NOTICE: install_plugin: Downloading: https://plugins.getnikola.com/v6/helloworld.zip[2013-10-12T16:51:58Z] NOTICE: install_plugin: Extracting: helloworld into pluginsplugins/helloworld/requirements.txt[2013-10-12T16:51:58Z] NOTICE: install_plugin: This plugin has Python dependencies.[2013-10-12T16:51:58Z] NOTICE: install_plugin: Installing dependencies with pip...⋮⋮[2013-10-12T16:51:59Z] NOTICE: install_plugin: Dependency installation succeeded.[2013-10-12T16:51:59Z] NOTICE: install_plugin: This plugin has a sample config file.Contents of the conf.py.sample file: # Should the Hello World plugin say “BYE” instead?
BYE_WORLD = False
Then you also can uninstall your plugins:
$ nikola plugin --uninstall tags
[2014-04-15T08:59:24Z] WARNING: plugin: About to uninstall plugin: tags[2014-04-15T08:59:24Z] WARNING: plugin: This will delete /home/ralsina/foo/plugins/tagsAre you sure? [y/n] y[2014-04-15T08:59:26Z] WARNING: plugin: Removing /home/ralsina/foo/plugins/tags
And upgrade them:
$ nikola plugin --upgrade
[2014-04-15T09:00:18Z] WARNING: plugin: This is not very smart, it just reinstalls some plugins and hopes for the bestWill upgrade 1 plugins: graphvizUpgrading graphviz[2014-04-15T09:00:20Z] INFO: plugin: Downloading: https://plugins.getnikola.com/v7/graphviz.zip[2014-04-15T09:00:20Z] INFO: plugin: Extracting: graphviz into /home/ralsina/.nikola/plugins/[2014-04-15T09:00:20Z] NOTICE: plugin: This plugin has third-party dependencies you need to install manually.Contents of the requirements-nonpy.txt file: Graphviz http://www.graphviz.org/You have to install those yourself or through a package manager.
You can also share plugins you created with the community! Visit the
GitHub repository to find out more.
You can use the plugins in this repository without installing them into your
site, by cloning the repository and adding the path of the plugins directory to
the EXTRA_PLUGINS_DIRS list in your configuration.
For pdb debugging in Nikola, you should use doit.tools.set_trace() instead
of the usual pdb call. By default, doit (and thus Nikola) redirects stdout and
stderr. Thus, you must use the different call. (Alternatively, you could run
with nikola build -v 2, which disables the redirections.)
To show more logging messages, as well as full tracebacks, you need to set an
environment variable: NIKOLA_DEBUG=1. If you want to only see tracebacks,
set NIKOLA_SHOW_TRACEBACKS=1.
Since Nikola is a command line tool, and this is the 21st century, it's handy to have smart tab-completion
so that you don't have to type the full commands.
To enable this, you can use the nikola tabcompletion command like this,
depending on your shell:
$ nikola tabcompletion --shell bash --hardcode-tasks > _nikola_bash
$ nikola tabcompletion --shell zsh --hardcode-tasks > _nikola_zsh
The --hardcode-tasks adds tasks to the completion and may need updating periodically.
Please refer to your shell’s documentation for help on how to use those files.
Nikola is released under the MIT license, which is a free software license. Some
components shipped along with Nikola, or required by it are released under
other licenses.
If you are not familiar with free software licensing, here is a brief
explanation (this is NOT legal advice): In general, you can do pretty much
anything you want — including modifying Nikola, using and redistributing the
original version or the your modified version. However, if you redistribute
Nikola to someone else, either a modified version or the original version, the
full copyright notice and license text must be included in your distribution.
Nikola is provided “as is”, and the Nikola contributors are not liable for any
damage caused by the software. Read the full license text for details.
This document is a reference about themes. If you want a tutorial, please read
Creating a Theme. If you’re looking for a ready-made
theme for your site, check out the Themes Index.
Themes are located in the themes folder where Nikola is installed, and in the themes folder
of your site, one folder per theme. The folder name is the theme name.
A Nikola theme consists of the following folders (they are all optional):
assets
This is where you would put your CSS, JavaScript and image files. It will be copied
into output/assets when you build the site, and the templates will contain
references to them. The default subdirectories are css, js, xml
and fonts (Bootstrap).
The included themes use Bootstrap,
baguetteBox, Justified Layout by Flickr and Moment.js, so they are in assets, along with CSS files for
syntax highlighting, reStructuredText and Jupyter, as well as a minified
copy of jQuery.
If you want to base your theme on other frameworks (or on no framework at all)
just remember to put there everything you need for deployment. (Not all of
the listed assets are used by base)
templates
This contains the templates used to generate the pages. While Nikola will use a
certain set of template names by default, you can add others for specific parts
of your site.
messages
Nikola tries to be multilingual. This is where you put the strings for your theme
so that it can be translated into other languages.
less, sass
Files to be compiled into CSS using LESS and Sass (both require plugins)
This mandatory file:
<theme>.theme
An INI file containing theme meta data. The file format is described in
detail below, in the Theme meta files section.
And these optional files:
parent, engine
One-line text files that contain the names of parent and engine themes,
respectively. Those are needed for older versions (Nikola v7.8.5 and
older).
bundles
A config file
containing a list of files to be turned into bundles. For example:
This creates a file called "assets/css/all.css" in your output that is the
combination of all the other file paths, relative to the output file.
This makes the page much more efficient because it avoids multiple connections to the server,
at the cost of some extra difficult debugging.
Bundling applies to CSS and JS files.
Templates should use either the bundle or the individual files based on the use_bundles
variable, which in turn is set by the USE_BUNDLES option.
As of Nikola v7.8.6, Nikola uses meta files for themes. Those are INI files,
with the same name as your theme, and a .theme extension, eg.
bootstrap3.theme. Here is an example, from the bootstrap3 theme:
[Theme]engine=makoparent=baseauthor=The Nikola Contributorsauthor_url=https://getnikola.com/based_on=Bootstrap 3 <http://getbootstrap.com/>license=MITtags=bootstrap[Family]family=bootstrap3jinja_version=bootstrap3-jinjavariants=bootstrap3-gradients, bootstrap3-gradients-jinja[Nikola]bootswatch=True
The following keys are currently supported:
Theme — contains information about the theme.
engine — engine used by the theme. Should be mako or jinja.
parent — the parent theme. Any resources missing in this theme, will be
looked up in the parent theme (and then in the grandparent, etc).
The parent is so you don’t have to create a full theme each time: just
create an empty theme, set the parent, and add the bits you want modified.
You must define a parent, otherwise many features won’t work due to
missing templates, messages, and assets.
The following settings are recommended:
If your theme uses Bootstrap 3, inherit the bootstrap3 theme.
If your theme uses Jinja as a template engine, inherit base-jinja
or bootstrap3-jinja
In any other case, inherit base.
author, author_url — used to identify theme author.
based_on — optional list of inspirations, frameworks, etc. used in the
theme. Should be comma-separated, the format Name <URL> is recommended.
license — theme license. Pick MIT if you have no preference.
tags — optional list of tags (comma-separated) to describe the theme.
Family — contains information about other related themes. All values
optional. (Do not use unless you have related themes.)
family — the name of the main theme in a family, which is also used as
the family name.
mako_version, jinja_version — name of the mako/jinja version of the
theme.
variants — comma-separated list of stylistic variants (other than the
mako/jinja version listed above)
Nikola — Nikola-specific information, currently optional.
bootswatch — whether or not theme supports Bootswatch styling (optional,
defaults to False)
ignored_assets — comma-separated list of assets to ignore (relative to
the assets/ directory, eg. css/theme.css)
In templates there is a number of files whose name ends in .tmpl. Those are the
theme’s page templates. They are done using the Mako
or Jinja2 template languages. If you want to do a theme, you
should learn one first. What engine is used by the theme is declared in the engine file.
Tip
If you are using Mako templates, and want some extra speed when building the site
you can install Beaker and make templates be cached
Both template engines have a nifty concept of template inheritance. That means that a
template can inherit from another and only change small bits of the output. For example,
base.tmpl defines the whole layout for a page but has only a placeholder for content
so post.tmpl only define the content, and the layout is inherited from base.tmpl.
Another concept is theme inheritance. You do not need to duplicate all the
default templates in your theme — you can just override the ones you want
changed, and the rest will come from the parent theme. (Every theme needs a
parent.)
Apart from the built-in templates listed below, you can add other templates for specific
pages, which the user can then use in his POSTS or PAGES option in
conf.py. Also, you can specify a custom template to be used by a post or
page via the template metadata, and custom templates can be added in the
templates/ folder of your site.
If you want to modify (override) a built-in template, use nikola theme -c<name>.tmpl. This command will copy the specified template file to the
templates/ directory of your currently used theme.
Keep in mind that your theme is yours, so you can require whatever data you
want (eg. you may depend on specific custom GLOBAL_CONTEXT variables, or
post meta attributes). You don’t need to keep the same theme structure as the
default themes do (although many of those names are hardcoded). Inheriting from
at least base (or base-jinja) is heavily recommended, but not strictly
required (unless you want to share it on the Themes Index).
These are the templates that come with the included themes:
base.tmpl
This template defines the basic page layout for the site. It’s mostly plain HTML
but defines a few blocks that can be re-defined by inheriting templates.
It has some separate pieces defined in base_helper.tmpl,
base_header.tmpl and base_footer.tmpl so they can be
easily overridden.
index.tmpl
Template used to render the multipost indexes. The posts are in a posts variable.
Some functionality is in the index_helper.tmpl helper template.
archive_navigation_helper.tmpl (internal)
Code that implements archive navigation (previous/up/next). Included by
archive templates.
archiveindex.tmpl
Used to display archives, if ARCHIVES_ARE_INDEXES is True.
By default, it just inherits index.tmpl, with added archive navigation
and feeds.
author.tmpl
Used to display author pages.
authorindex.tmpl
Used to display author indexes, if AUTHOR_PAGES_ARE_INDEXES is True.
By default, it just inherits index.tmpl, with added feeds.
comments_helper.tmpl (internal)
This template handles comments. You should probably never touch it :-)
It uses a bunch of helper templates, one for each supported comment system
(all of which start with comments_helper)
ui_helper.tmpl, pagination_helper.tmpl
These templates help render specific UI items, and can be tweaked as needed.
gallery.tmpl
Template used for image galleries. Interesting data includes:
post: A post object, containing descriptive post.text() for the gallery.
crumbs: A list of link, crumb to implement breadcrumbs.
folders: A list of folders to implement hierarchical gallery navigation.
enable_comments: To enable/disable comments in galleries.
thumbnail_size: The THUMBNAIL_SIZE option.
photo_array: a list of dictionaries, each containing:
url: URL for the full-sized image.
url_thumb: URL for the thumbnail.
title: The title of the image.
size: A dict containing w and h, the real size of the thumbnail.
photo_array_json: a JSON dump of photo_array, used by the
justified-layout script
list.tmpl
Template used to display generic lists of links, which it gets in items,
a list of (text, link, count) elements.
list_post.tmpl
Template used to display generic lists of posts, which it gets in posts.
listing.tmpl
Used to display code listings.
math_helper.tmpl (internal)
Used to add MathJax/KaTeX code to pages.
post.tmpl
Template used by default for blog posts, gets the data in a post object
which is an instance of the Post class. Some functionality is in the
post_helper.tmpl and post_header.tmpl templates.
post_list_directive.tmpl
Template used by the post_list reStructuredText directive.
sectionindex.tmpl
Used to display section indexes, if POST_SECTIONS_ARE_INDEXES is True.
By default, it just inherits index.tmpl, with added feeds.
page.tmpl
Used for pages that are not part of a blog, usually a cleaner, less
intrusive layout than post.tmpl, but same parameters.
tag.tmpl
Used to show the contents of a single tag or category.
tagindex.tmpl
Used to show the contents of a single tag or category, if TAG_PAGES_ARE_INDEXES is True.
By default, it just inherits index.tmpl, with added feeds and some
extra features.
The user’s preference for theme color is exposed in templates as
theme_color set in the THEME_COLOR option.
Each section has an assigned color that is either set by the user or auto
selected by adjusting the hue of the user’s THEME_COLOR. The color is
exposed in templates through post.section_color(lang). The function that
generates the colors from strings and any given color (by section name and
theme color for sections) is exposed through the
colorize_str_from_base_color(string, hex_color) function
Hex color values, like that returned by the theme or section color can be
altered in the HSL colorspace through the function
color_hsl_adjust_hex(hex_string, adjust_h, adjust_s, adjust_l).
Adjustments are given in values between 1.0 and -1.0. For example, the theme
color can be made lighter using this code:
Nikola provides a pagekind in each template contexts that can be used to
modify shared templates based on the context it’s being used. For example,
the base_helper.tmpl is used in all pages, index.tmpl is used in
many contexts and you may want to add or remove something from only one of
these contexts.
Example of conditionally loading different resources on all index pages
(archives, author pages, and tag pages), and others again to the front page
and in every post pages:
Promoting visits to the front page when visiting other filtered
index.tmpl page variants such as author pages and tag pages. This
could have been included in index.tmpl or maybe in base.tmpl
depending on what you want to achieve.
<!-- Mako -->%if'index'inpagekind:%if'author_page'inpagekind:<p>These posts were written by ${author}. See posts by all
authors on the <ahref="/">front page</a>.</p>%elif'tag_page'inpagekind:<p>This is a filtered selection of posts tagged “${tag}”, visit
the <ahref="/">front page</a> to see all posts.</p>% endif% endif
<!-- Jinja2 -->{%if'index'inpagekind%}{%if'author_page'inpagekind%}<p>These posts were written by {{author}}. See posts by all
authors on the <ahref="/">front page</a>.</p>{%elif'tag_page'inpagekind%}<p>This is a filtered selection of posts tagged “{{tag}}”, visit
the <ahref="/">front page</a> to see all posts.</p>{%endif%}{%endif%}
The LESS and Sass compilers were moved to the Plugins Index in
Nikola v7.0.0.
If you want to use those CSS extensions, you can — just store your files
in the less or sass directory of your theme.
In order to have them work, you need to create a list of .less or
.scss/.sass files to compile — the list should be in a file named
targets in the respective directory (less/sass).
The files listed in the targets file will be passed to the respective
compiler, which you have to install manually (lessc which comes from
the Node.js package named less or sass from a Ruby package aptly
named sass). Whatever the compiler outputs will be saved as a CSS
file in your rendered site, with the .css extension.
Note
Conflicts may occur if you have two files with the same base name
but a different extension. Pay attention to how you name your files
or your site won’t build! (Nikola will tell you what’s wrong when
this happens)